
Installation Guide for Bold Upsell
Bold Upsell must be properly installed on your Shopify theme in order to function correctly on your store. The installation ensures the Upsell modal appears on your storefront when triggered by your customers.
Manual install (via app embed)
Note: The manual install via app embed can be performed on both vintage and Online Store 2.0 themes.
Step 1: Enable Upsell Modal Settings
From your Shopify admin, select Online Store > Themes.
Select Customize next to the theme you would like to install Upsell on.
-
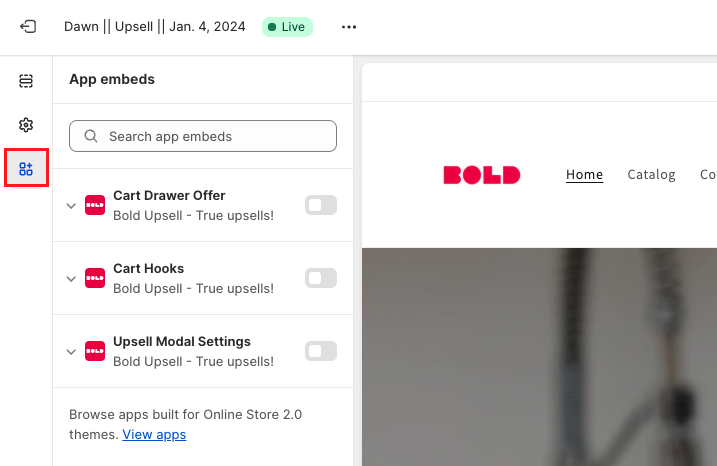
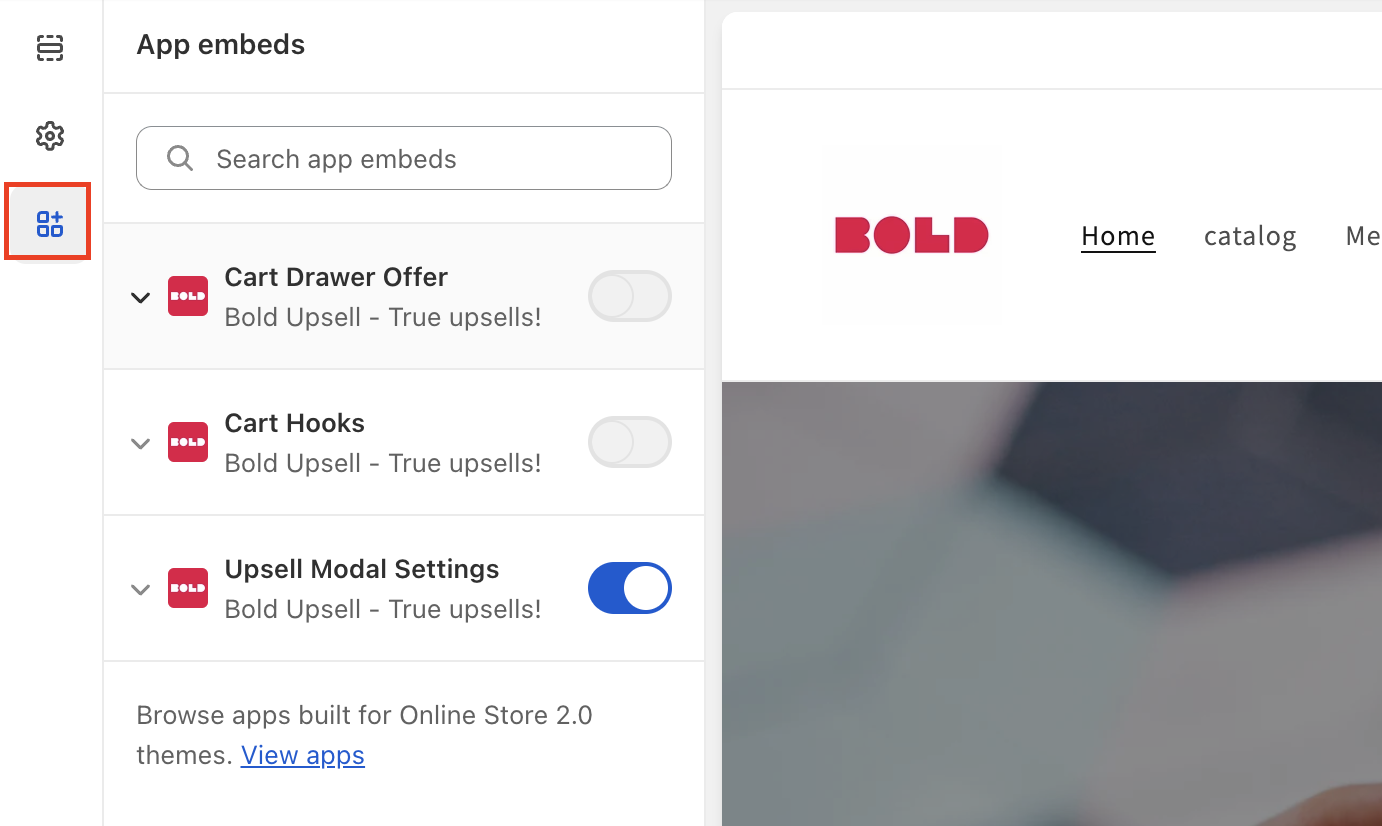
Select the App embeds icon in the left menu.
-
Enable Upsell Model Settings by sliding the toggle to the right.
-
Optional: Click the arrow next to Upsell Modal Settings to expand the settings and customize the Upsell modal. Check the box next to Enable preview to view your changes as you make them.
Note: If you prefer to style the Upsell modal later, visit Customize Upsell with Theme App Extension.
Click Save in the top-right corner.
Manual Liquid code install (legacy)
Alert: All new Upsell installations can be performed using the instructions shown in the Manual install (via app embed) section above. The Liquid instructions in this section are only relevant to those who’ve installed Upsell on a vintage theme prior to January 4, 2024.
Step 1: Add Snippet/Asset Files
From the Shopify admin, select Online Store.
Select Actions.
Duplicate the theme you would like the installation completed on.
Select Edit Code on the duplicated theme.
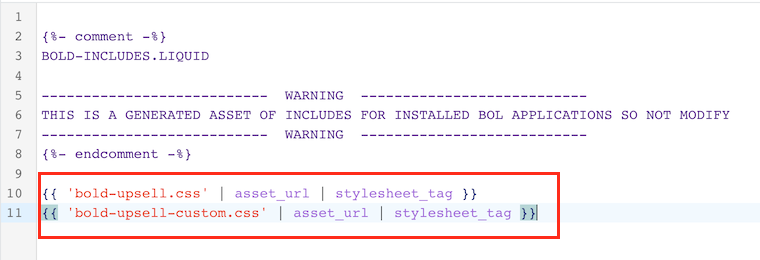
Under Snippets, find these files:
- bold-common.liquid
- bold-includes.liquid
If these snippet files don't exist, please follow the steps below. If they do exist, skip to step #7.
- Select Add a new snippet.
- Enter the correct snippet name.
- Select Create snippet.
- Copy and paste the following code into their respective files:
{%- comment -%}
BOLD-COMMON.LIQUID
Last updated: 2018-Aug-9
--------------------------- WARNING ---------------------------
This file is auto-generated by BOLD and should not be modified.
It may be overwritten and any customizations would be lost.
--------------------------- WARNING ---------------------------
{%- endcomment -%}
<script>
{%- comment -%} common data {%- endcomment -%}
window.BOLD = window.BOLD || {};
window.BOLD.common = window.BOLD.common || {};
window.BOLD.common.Shopify = window.BOLD.common.Shopify || {};
window.BOLD.common.Shopify.shop = {
domain: '{{ shop.domain }}',
permanent_domain: '{{ shop.permanent_domain }}',
url: '{{ shop.url }}',
secure_url: '{{ shop.secure_url }}',
money_format: {{ shop.money_format | json }},
currency: {{ shop.currency | json }}
};
window.BOLD.common.Shopify.customer = {
id: {{ customer.id | json }},
tags: {{ customer.tags | json }},
};
window.BOLD.common.Shopify.cart = {{ cart | json }};
window.BOLD.common.template = '{{ template | split: "." | first }}';
{%- comment -%} common functions {%- endcomment -%}
window.BOLD.common.Shopify.formatMoney = function(money, format) {
function n(t, e) {
return "undefined" == typeof t ? e : t
}
function r(t, e, r, i) {
if (e = n(e, 2),
r = n(r, ","),
i = n(i, "."),
isNaN(t) || null == t)
return 0;
t = (t / 100).toFixed(e);
var o = t.split(".")
, a = o[0].replace(/(\d)(?=(\d\d\d)+(?!\d))/g, "$1" + r)
, s = o[1] ? i + o[1] : "";
return a + s
}
"string" == typeof money && (money = money.replace(".", ""));
var i = ""
, o = /\{\{\s*(\w+)\s*\}\}/
, a = format || window.BOLD.common.Shopify.shop.money_format || window.Shopify.money_format || "$ {% raw %}{{ amount }}{% endraw %}";
switch (a.match(o)[1]) {
case "amount":
i = r(money, 2, ",", ".");
break;
case "amount_no_decimals":
i = r(money, 0, ",", ".");
break;
case "amount_with_comma_separator":
i = r(money, 2, ".", ",");
break;
case "amount_no_decimals_with_comma_separator":
i = r(money, 0, ".", ",");
break;
case "amount_with_space_separator":
i = r(money, 2, " ", ",");
break;
case "amount_no_decimals_with_space_separator":
i = r(money, 0, " ", ",");
break;
case "amount_with_apostrophe_separator":
i = r(money, 2, "'", ".");
break;
}
return a.replace(o, i);
};
window.BOLD.common.Shopify.saveProduct = function (handle, product) {
if (typeof handle === 'string' && typeof window.BOLD.common.Shopify.products[handle] === 'undefined') {
if (typeof product === 'number') {
window.BOLD.common.Shopify.handles[product] = handle;
product = { id: product };
}
window.BOLD.common.Shopify.products[handle] = product;
}
};
window.BOLD.common.Shopify.saveVariant = function (variant_id, variant) {
if (typeof variant_id === 'number' && typeof window.BOLD.common.Shopify.variants[variant_id] === 'undefined') {
window.BOLD.common.Shopify.variants[variant_id] = variant;
}
};
{%- comment -%} product data {%- endcomment -%}
window.BOLD.common.Shopify.products = window.BOLD.common.Shopify.products || {};
window.BOLD.common.Shopify.variants = window.BOLD.common.Shopify.variants || {};
window.BOLD.common.Shopify.handles = window.BOLD.common.Shopify.handles || {};
{%- if template == 'product' -%}
window.BOLD.common.Shopify.handle = {{ product.handle | json }}
{%- endif -%}
{%- comment -%} product page {%- endcomment -%}
window.BOLD.common.Shopify.saveProduct({{ product.handle | json }}, {{ product.id | json }});
{%- for variant in product.variants -%}{%- assign csp_metafield_namespace = variant.id | prepend: "csp" -%}window.BOLD.common.Shopify.saveVariant({{ variant.id | json }}, { product_id: {{ product.id | json }}, product_handle: {{ product.handle | json }}, price: {{ variant.price | json }}, group_id: '{{variant.metafields.bold_rp.rp_group_id}}', csp_metafield: {{ product.metafields[csp_metafield_namespace] | json }}});{%- endfor -%}
{%- comment -%} BOLD APPS INSTALLED {%- endcomment -%}
{%- assign bold_apps_installed = shop | map: 'metafields' | map: 'bold_apps_installed' | first -%}
window.BOLD.apps_installed = {{ bold_apps_installed | json }} || {};
{%- unless bold_apps_installed contains 'Customer Pricing' or bold_apps_installed contains 'Product Bundles' or bold_apps_installed contains 'Product Discount' or bold_apps_installed contains 'Quantity Breaks' or bold_apps_installed contains 'Custom Order' or bold_apps_installed contains 'Order Manager' or bold_apps_installed contains 'The Motivator'-%}
{%- comment -%} collection page {%- endcomment -%}
{%- for product in collection.products -%}
window.BOLD.common.Shopify.saveProduct({{ product.handle | json }}, {{ product.id | json }});
{%- for variant in product.variants -%}{%- assign csp_metafield_namespace = variant.id | prepend: "csp" -%}window.BOLD.common.Shopify.saveVariant({{ variant.id | json }}, { product_id: {{ product.id | json }}, product_handle: {{ product.handle | json }}, price: {{ variant.price | json }}, group_id: '{{variant.metafields.bold_rp.rp_group_id}}', csp_metafield: {{ product.metafields[csp_metafield_namespace] | json }}});{%- endfor -%}
{%- endfor -%}
{%- comment -%} search page {%- endcomment -%}
{%- for product in search.results -%}
window.BOLD.common.Shopify.saveProduct({{ product.handle | json }}, {{ product.id | json }});
{%- for variant in product.variants -%}{%- assign csp_metafield_namespace = variant.id | prepend: "csp" -%}window.BOLD.common.Shopify.saveVariant({{ variant.id | json }}, { product_id: {{ product.id | json }}, product_handle: {{ product.handle | json }}, price: {{ variant.price | json }}, group_id: '{{variant.metafields.bold_rp.rp_group_id}}', csp_metafield: {{ product.metafields[csp_metafield_namespace] | json }}});{%- endfor -%}
{%- endfor -%}
{%- endunless -%}
{%- comment -%} cart page {%- endcomment -%}
{%- for item in cart.items -%}{%- assign csp_metafield_namespace = item.variant_id | prepend: "csp" -%}window.BOLD.common.Shopify.saveVariant({{ item.variant_id | json }}, { product_id: {{ item.product.id | json }}, product_handle: {{ item.product.handle | json }}, price: {{ item.variant.price | json }}, group_id: '{{item.variant.metafields.bold_rp.rp_group_id}}', csp_metafield: {{ item.product.metafields[csp_metafield_namespace] | json }}});{%- endfor -%}
{%- comment -%} metafields {%- endcomment -%}
window.BOLD.common.Shopify.metafields = window.BOLD.common.Shopify.metafields || {};
{%- assign metafield_namespaces_to_load = 'bold_rp,bold_csp_defaults' | split: ',' -%}
{%- for namespace in metafield_namespaces_to_load -%}
window.BOLD.common.Shopify.metafields[{{ namespace | json }}] = {{ shop.metafields[namespace] | json }};
{%- endfor -%}
window.BOLD.common.cacheParams = window.BOLD.common.cacheParams || {};
</script>

{%- comment -%} INCLUDE APP SCRIPTS BELOW {%- endcomment -%}
{%- comment -%} BOLD-INCLUDES.LIQUID --------------------------- WARNING --------------------------- THIS IS A GENERATED ASSET OF INCLUDES FOR INSTALLED BOL APPLICATIONS SO NOT MODIFY --------------------------- WARNING --------------------------- {%- endcomment -%}
- Select Save.
Under Assets, find these files:
- bold-upsell.css
- bold-upsell-custom.css
If the Asset files do not exist, please follow the steps below. If they do exist, skip to step Step 2: Edit bold-includes.liquid.
- Select Add a new asset > Create a blank file.
- Enter the correct asset name, then select .css in the file type dropdown.
- Select Add asset.
-
Copy and paste the following code found in each of these links, into their respective files:
/*
------------------------------------  WARNING  ------------------------------------
This file will be overwritten and should not be edited directly.
In order to edit custom CSS for Bold Product Upsell you should:
- Log into your Shopify Admin Panel
- Go to Apps -- Installed -- Product Upsell
- Go to Display Settings
------------------------------------  WARNING  ------------------------------------
*/
.bold-modal {
  box-sizing: border-box;
  position: fixed;
  width: 100%;
  height: 100%;
  top: 0;
  left: 0;
  right: 0;
  bottom: 0;
  z-index: 99999999;
  display: none; }

  .bold-modal__window {
    box-sizing: border-box;
    padding: 30px;
    background-color: #fff;
    position: fixed;
    left: 0;
    right: 0;
    bottom: 0;
    overflow-y: auto; }

  .bold-modal__btn-close {
    box-sizing: border-box;
    display: block;
    font-weight: 900;
    width: 40px;
    height: 40px;
    font-size: 20px;
    line-height: 40px;
    text-align: center;
    color: rgba(0,0,0,0.2);
    position: absolute;
    top: 0;
    right: 0;
    cursor: pointer; }

    .bold-modal__btn-close:hover {
      opacity: 0.5; }


  .bold-modal__header {
    box-sizing: border-box;
    height: 40px;
    line-height: 40px;
    padding: 0 70px 0 30px;
    margin: -30px -30px 0px;
    overflow: hidden;
    text-overflow: ellipsis;
    white-space: nowrap; }

  .bold-modal__content {
    box-sizing: border-box;
    padding: 30px;
    margin: -30px -30px 0; }

    .bold-modal__header+.bold-modal__content {
      margin-top: 0; }

    .bold-modal__content:last-child {
      margin-bottom: -30px; }

  .bold-modal__footer {
    box-sizing: border-box;
    padding: 30px;
    margin: 0px -30px -30px; }


/* Showing and Hiding the Modal */
body.bold-modal--is-showing,
div.bold-modal--is-showing {
  overflow-y: hidden !important; }

body.bold-modal--is-showing .bold-modal,
div.bold-modal--is-showing .bold-modal {
  display: block; }

/* Transitions and Animations */
.bold-modal--animated {
  display: block;
  visibility: hidden;
  -webkit-transition: 0.3s ease;
  -moz-transition: 0.3s ease;
  transition: 0.3s ease; }

.bold-modal--animated .bold-modal__window {
  top: 100vh;
  -webkit-transition: 0.3s ease;
  -moz-transition: 0.3s ease;
  transition: 0.3s ease; }

body.bold-modal--is-showing .bold-modal--animated,
div.bold-modal--is-showing .bold-modal--animated {
  visibility: visible;
  opacity: 1; }

@media only screen and (min-width: 499px) {
  .bold-modal {
    background: rgba(0,0,0,0.8);
    overflow-y: auto; }

    .bold-modal__window {
      position: relative;
      margin: 40px; }

  .bold-modal--animated {
    opacity: 0; }

    .bold-modal--animated .bold-modal__window {
      top: 200px; }
}

@media only screen and (min-width: 879px) {
  .bold-modal__window {
    max-width: 800px;
    margin: 40px auto; }
}

/* bold.grid.css */
.bold-grid {
  box-sizing: border-box;
  margin: 0px -15px; }

.bold-grid:after {
  box-sizing: border-box;
  display: table;
  content: '';
  clear: both; }

.bold-grid__column {
  box-sizing: border-box;
  padding: 15px;
  float: left;
}

.bold-grid__column--half{
  width: 50%;
}

.bold-grid__column--third{
  width: 33.3333%;
}

@media only screen and (max-width: 700px) {

  .bold-grid__column--half,
  .bold-grid__column--third,
  .bold-grid__column--quarter {
    width: 100%; }

  .bold-grid__column--third:first-child {
    width: 100%;
  }


  .flickity-slider .bold-grid__column--half,
  .flickity-slider .bold-grid__column--third,
  .flickity-slider .bold-grid__column--quarter {
    width: 70%;
  }

  .flickity-slider .bold-grid__column--third:first-child {
    width: 70%;
  }

}


/* bold.grid.css */

/* bold.product.css */
.bold-product {
  box-sizing: border-box; }

.bold-product__image-container {
  box-sizing: border-box; }

.bold-product__image {
  box-sizing: border-box;
  display: inline-block;
  max-width: 100%;
  max-height: 300px;}

 /* BEGIN Trigger Product display styling  */
.bold-upsell__triger-product-container{
  display: flex;
  box-sizing: border-box;
  margin-bottom: 15px;
}

.bold-upsell__triger-image-container .bold-upsell__triger-image{
  box-sizing: border-box;
  display: inline-block;
  width: 85px;
  height: 85px;
}

.bold-upsell__triger-product-container .bold-product__info{
  width: calc(100% - 85px);
  display: inline-block;
  margin: 0 0 0 20px;
}
.bold-upsell__triger-product-container .bold-product__info div{
  max-height: 20px;
  margin-bottom: 3px;
}

.bold-upsell__triger-product-container .bold-product__info .bold-product__quantity{
  opacity: 0.7;
}

.bold-upsell__triger-product-container .bold-product__info .bold-product__title{
  max-height: 20px;
  overflow: hidden;
  margin-bottom: 0px;
}

.bold-upsell__triger-product-container .bold-product__info .bold-product__variant{
  opacity: 0.7;
}

.bold-upsell__triger-product-container .bold-product__info .bold-product__pricing{
  margin-top: 0px;
}

.bold-upsell__triger-product-container .bold-product__info .bold-product__price{
  font-size: 100%;
}
 /*---END Trigger Product display styling -----*/

.bold-product__control {
  box-sizing: border-box; }

.bold-product__variant-selector {
  font: inherit;
  width: 100%; }
/* bold.product.css */

/* bold.upsell.css */
.bold-upsell {
  box-sizing: border-box; }

.bold-upsell__intro {
  box-sizing: border-box; }

.bold-upsell__products-list {
  box-sizing: border-box; }

.bold-upsell__products-list .bold-grid__column {
  text-align: center; }

.bold-upsell__actions {
  text-align: right; }

.bold-upsell__button {
  box-sizing: border-box; }
/* bold.upsell.css */

.bold-grid__column--half .bold-product .bold-product__image,
.bold-grid__column--third .bold-product .bold-product__image {
  max-height: 100%;
  max-width: 100%;
  position: absolute;
  top: 50%;
  left: 50%;
  -webkit-transform: translate(-50%, -50%);
  -moz-transform: translate(-50%, -50%);
  -ms-transform: translate(-50%, -50%);
  -o-transform: translate(-50%, -50%);
  transform: translate(-50%, -50%);
}

.bold-grid__column--half .bold-product .bold-product__image-container,
.bold-grid__column--third .bold-product .bold-product__image-container {
  max-height: 300px;
  max-width: 300px;
  width: 100%;
  height: 0;
  padding-bottom: 100%;
  position: relative;
  margin: 0 auto;
}

/*Options Modal stuff*/
#bold-modal-second__window #bold-modal__content .bold-product__info {
  display: inline-flex;
}

#bold-modal-second__window #bold-modal__content .bold-product__info #option_product_info{
  padding-left: 15px;
}

#bold-modal-second__window #bold-modal__content .bold-product__image {
  max-height: 100%;
  max-width: 100%;
  position: absolute;
  top: 50%;
  left: 50%;
  -webkit-transform: translate(-50%, -50%);
  -moz-transform: translate(-50%, -50%);
  -ms-transform: translate(-50%, -50%);
  -o-transform: translate(-50%, -50%);
  transform: translate(-50%, -50%);
}

#bold-modal-second__window #bold-modal__content .bold-product__image {
  max-height: 75px;
  max-width: 75px;
  position: relative;
}

#bold-modal-second__window #bold-modal__content #bold_options {
  text-align: center;
}

#bold-modal-second__window #options_scroll_display{
  position: absolute;
  padding: 5px;
  border-radius: 25px;
  background-color: #3498db;
  font-size: 12px;
  left: 50%;
  bottom: 20px;
  border: 1px solid rgba(0,0,0,0.2);
  z-index: 2;
  color: #FFF;
  transform: translateX(-50%);
}

#second_window_back_btn {
  float: left;
  padding-top: 20px;
}

#bold-modal-second__window .bold-modal__footer .bold-product__quantity-field  {
  width: 75px;
}

#loader {
  position: relative;
  left: 50%;
  top: 50%;
  z-index: 1;
  width: 120px;
  height: 120px;
  margin: 25px 0 0 -75px;
  border: 16px solid #f3f3f3;
  border-radius: 50%;
  border-top: 16px solid #3498db;
  -webkit-animation: spin 2s linear infinite;
  animation: spin 2s linear infinite;
}

@-webkit-keyframes spin {
  0% { -webkit-transform: rotate(0deg); }
  100% { -webkit-transform: rotate(360deg); }
}

@keyframes spin {
  0% { transform: rotate(0deg); }
  100% { transform: rotate(360deg); }
}

@-webkit-keyframes animatebottom {
  from { bottom:-100px; opacity:0 }
  to { bottom:0px; opacity:1 }
}

@keyframes animatebottom {
  from{ bottom:-100px; opacity:0 }
  to{ bottom:0; opacity:1 }
}


/*Nate Styles... or whatever*/

#bold-modal-second__window .bold-control-group__item{
  display: inline-block;
  width: initial;
}

#bold-modal-second__window .bold-product__control-label{
  float: left;
  margin: 15px 10px 0 0 ;
}

#bold-modal-second__window .bold-modal__footer .bold-product__quantity-field {
  width: 75px;
  float: right;
  padding: 18px 18px 17px;
}

#bold-modal-second__window .scroll_visual::after{
  content: "";
  display: block;
  background: linear-gradient(to bottom, rgba(255,255,255,0) 0%,rgba(0,0,0,.4) 100%);
  width: 100%;
  height: 60px;
  position: absolute;
  left: 0;
  bottom: 0;
  transition: all .4s ease-in-out;
}

#bold-modal-second__window .bold-upsell__products-list{
  position: relative;
}

@media screen and (max-width: 550px){

  #bold-modal-second__window .bold-control-group__item{
    width: 100%;
    margin-bottom: 10px;
  }

}


/* =============================================================================
  Responsive Slider Styles
============================================================================= */

.bold-modal__slider{
  position: relative;
}

.bold-modal__slider:after{
  display: none;
  width: 200px;
  height: 100%;
  position: absolute;
  content: "";
  background: linear-gradient(to right, rgba(255,255,255,0) 0%,rgba(255,255,255,1) 100%);
  top: 0px;
  right: -15px;
  opacity: 1;
  pointer-events: none;
  z-index: 10;
  transition: opacity .4s ease-in-out;
}

@media screen and (max-width: 699px){
  .bold-modal__slider:after{
    display: none;
  }
}

.bold-modal__slider .flickity-prev-next-button{
  z-index: 11;
  background: #adadad !important;
  width: 32px !important;
  height: 32px !important;
  opacity: .85 !important;
  transition: opacity .4s ease-in-out;
  top: 40% !important;
}

.bold-modal__slider .flickity-prev-next-button svg{
  width: 40% !important;
  left: 29% !important;
}

.bold-modal__slider .flickity-prev-next-button svg *{
  fill: #fff !important;
}

.bold-modal__slider .flickity-prev-next-button:disabled{
  opacity: 0 !important;
}

.bold-modal__slider .next{
  right: -5px !important;
}

.bold-modal__slider .previous{
  left: -5px !important;
}

.bold-modal__slider .flickity-page-dots{
  bottom: -15px !important;
}

@media screen and (max-width: 499px){
  .bold-modal__window{
    width: calc(100% - 40px);
    height: calc(100% - 40px);
    top: 20px !important;
    left: 20px;
  }
}


/* Options second window */

#bold-modal-second__window .bold_option {
    display: flex;
    margin-bottom: 16px;
    text-align: left;
    padding: 0 40px;
}

@media screen and (max-width: 600px){
  #bold-modal-second__window .bold_option {
      padding: 0 15px;
  }
}

#bold-modal-second__window .bold_option_title {
    flex: 1 0 35%;
    padding-right: 20px;
}

#bold-modal-second__window .bold_option_element {
    flex: 1 0 65%;
    flex-wrap: wrap;
}

#bold-modal-second__window .bold_option_dropdown label {
    display: flex;
    width: 100%;
}

#bold-modal-second__window .bold_option_element label {
    display: block;
    margin-bottom: 10px;
}

#bold-modal-second__window .bold_option_element select {
    width: 100%;
}

#bold-modal-second__window .bold_option_product_title {
    display: none;
}

#bold-modal-second__window .bold_option_textbox label {
    width: 100%;
    display: flex;
}


#bold-modal-second__window .bold_option_textbox .bold_option_element {
    display: block;
    width: 65%;
}

#bold-modal-second__window .bold_option_textbox .bold_option_element input {
    width: 100%;
}


#bold-modal-second__window .bold_option_radio input {
    margin-right: 8px;
}

#bold-modal-second__window .bold_option_title {
    display: block;
    width: 35%;
}

#bold-modal-second__window .bold_option_value {
    margin-right: 0;
    display: block;
    width: 100%;
}

#bold-modal-second__window .bold_option_value label {
    display: flex;
}

#bold-modal-second__window .with-options {
    font-size: 16px;
    padding: 0px;
    margin: 0;
    width: 100%;
    border: 0;
    overflow-x: hidden;
}


#second_window_back_btn {
    float: left;
    padding-top: 14px;
  }

#bold-modal-second__window .scroll_visual::after {
    background: linear-gradient(to bottom, rgba(255,255,255,0) 0%,rgba(0,0,0,.14) 100%);
}

#bold-modal-second__window .bold-modal__content {
    padding: 0;
}

#bold-modal-second__window .bold-upsell__intro {
    padding: 10px 30px 10px;
}

#bold-modal-second__window .bold-upsell__intro .bold-product__title {
    font-size: 18px;
}

#bold-modal-second__window .bold-upsell__intro .bold-product__price {
    font-size: 16px;
}

#bold-modal-second__window .bold-upsell__actions {
    padding: 20px 30px
;
}

#bold-modal-second__window .bold-upsell__actions .bold-upsell__button--primary {
    padding: 10px 20px
;
}

#bold-modal-second__window .bold-upsell__products-list {
    padding: 30px 0px 0;
    margin: 0;
    border-top: 1px solid rgba(0,0,0,.16);
    border-bottom: 1px solid rgba(0,0,0,.16);
}

#bold-modal-second__window #bold-modal__content .bold-product__info {
    display: flex;
    margin: 0;
}
#bold-modal-second__window .bold_option_checkbox label{
  display: flex;
  width: 100%;
}
#bold-modal-second__window .bold_option_checkbox .bold_option_title{

}

#bold-modal-second__window .bold_option_checkbox .bold_option_element {
    width: 35px;
    flex: 1 0 35px;
}


@media screen and (max-width: 600px){
  #bold-modal-second__window .bold_option_checkbox .bold_option_title {
      flex: 1 0 70%;
  }

  #bold-modal-second__window .bold-upsell__products-list{
    padding: 10px;
  }
}

#bold-modal-second__window .bold_option_value_price::before {
    content: "+";
}

#bold-modal-second__window #options_scroll_display {
    border: 0;
    padding: 5px 12px;
    box-shadow: 0px 4px 8px rgba(0,0,0,.1);
    /*animation: jiggle 3s linear infinite;*/
    bottom: 12px;
}

#bold-upsell__button--primary {
    padding-top: 14px;
}

#bold-modal-second__window .bold_option_swatch .bold_option_element{
    display: flex;
    flex-wrap: wrap;
}

#bold-modal-second__window .bold_option_swatch .bold_option_value{
    display: block;
    width: 40px;
  	margin-right: 10px;
  	margin-bottom: 10px;

}

#bold-modal-second__window .bold_option_dropdownmulti label{
	width: 100%;
	display: flex;
}


/* Product options: Textarea */

#bold-modal-second__window .bold_option_textarea label {
    width: 100%;
    display: flex;
}

#bold-modal-second__window .bold_option_textarea .bold_option_title {
    flex: 1 0 35%;
}

#bold-modal-second__window .bold_option_textarea .bold_option_element {
    flex: 1 0 65%;
}

#bold-modal-second__window .bold_option_textarea textarea {
    width: 100%;
    max-width: 100%;
}


/* Product options: Textbox multi */

#bold-modal-second__window .bold_option_textboxmulti{
  flex-wrap: wrap;
}

#bold-modal-second__window .bold_option_textboxmulti .bold_option_title{
    flex: 1 0 35%;
}

#bold-modal-second__window .bold_option_textboxmulti .bold_option_element{
    flex: 1 0 65%;
}

#bold-modal-second__window .bold_option_textboxmulti label{
  flex-wrap: wrap;
}

#bold-modal-second__window .bold_option_textboxmulti .bold_help_text{
  flex: 1 0 100%;
  padding-left: 35%;
}

#bold-modal-second__window .bold_option_textboxmulti .bold_option_value_title{
  display: block;
  flex: 1 0 100%;
}

#bold-modal-second__window .bold_option_textboxmulti .bold_option_value_element{
  display: block;
  flex: 1 0 100%;
}

#bold-modal-second__window .bold_option_textboxmulti .bold_option_value_element input{
  width: 100%;
}


/* Product options: Number */

#bold-modal-second__window .bold_option_number label{
  display: flex;
  width: 100%;
}

#bold-modal-second__window .bold_option_number input{
  width: 100%;
}


/* Product options: Email */

#bold-modal-second__window .bold_option_email label{
  display: flex;
  width: 100%;
}

#bold-modal-second__window .bold_option_email input{
  width: 100%;
}


/* Product options: Color */

#bold-modal-second__window .bold_option_color label{
  display: flex;
  width: 100%;
}


/* Product options: Date */

#bold-modal-second__window .bold_option_date label{
  display: flex;
  width: 100%;
}

#bold-modal-second__window .bold_option_date input{
  width: 100%;
}


/* Product options: Telephone */

#bold-modal-second__window .bold_option_telephone label{
  display: flex;
  width: 100%;
}

#bold-modal-second__window .bold_option_telephone input{
  width: 100%;
}


/* bold options file upload */

#bold-modal-second__window .bold_option_uploadfile label{
  display: flex;
  width: 100%;
}

#bold-modal-second__window .bold_option_uploadfile input{
  width: 100%;
}

@keyframes jiggle {
  0% {
    transform: translate(-50%,0);
  }
  65% {
    transform: translate(-50%,0);
  }
  70% {
    transform: translate(-50%,5px);
  }
  75% {
    transform: translate(-50%,-4px);
  }
  80% {
    transform: translate(-50%,3px);
  }
  85% {
    transform: translate(-50%,-2px);
  }
  90% {
    transform: translate(-50%,1px);
  }
  95% {
    transform: translate(-50%, 0px);
  }
}

/* =============================================================================
  MODAL STYLES
============================================================================= */
.bold-modal {
  background-color: rgba(0,0,0,0.8); }

  .bold-modal__window {
    box-shadow: 0px 5px 15px rgba(0,0,0,0.2);
    border-radius: 5px; }

  .bold-modal__header {
    font-size: 12px;
    color: rgba(0,0,0,0.4);
    text-transform: uppercase;
    border-bottom: 1px solid rgba(0,0,0,0.1); }

  .bold-modal__footer {
    border-top: 1px solid rgba(0,0,0,0.1);
    background-color: rgba(0,0,0,0.02); }


/* =============================================================================
  UPSELL STYLES
============================================================================= */
.bold-upsell {}

  .bold-upsell__intro {
    font-size: 14px;
    line-height: 1.5; }

  .bold-upsell__intro-heading {
    font-size: 24px; }

.bold-upsell__button--primary:link,
.bold-upsell__button--primary:visited,
.bold-upsell__button--primary:hover,
.bold-upsell__button--primary:active,
.bold-upsell__button--primary:focus {
  color: inherit;
  text-decoration: none; }

.bold-upsell__button--primary {
  display: inline-block;
  padding: 15px 25px;
  border: 1px solid rgba(0,0,0,0.3);
  background-color: rgba(0,0,0,0.03);
  border-radius: 2px; }

  .bold-upsell__button--primary:hover {
    background-color: rgba(0,0,0,0);
    border-color: rgba(0,0,0,0.2); }

  .bold-upsell__button--primary:active {
    background-color: rgba(0,0,0,0.05);
    border-color: rgba(0,0,0,0.4); }

.bold-upsell__button--secondary {
  margin-right: 20px;
  font-size: 90%; }


/* =============================================================================
  PRODUCT STYLES
============================================================================= */
.bold-product {
  max-width: auto;
  font-size: 13px;
  background-color: rgba(255,255,255, 0.5);
  border: 1px solid rgba(0,0,0,0.2);
  padding: 10px; }

  .bold-product.bold-grid {
    margin-left: 0;
    margin-right: 0; }

  .bold-product__info,
  .bold-product__variants,
  .bold-product__actions {
    margin: 10px 0; }

  .bold-product__pricing {
    margin: 15px 0; }

  .bold-product__title {
    font-size: 15px;
    font-weight: bold;
    margin-bottom: 5px; }

  .bold-product__description {
    opacity: 0.6;
    margin-bottom: 10px; }

.bold-product__price {
  display: inline;
  margin: 0px 3px;
  font-weight: bold;
  font-size: 150%; }

.bold-product__message {
  opacity: 0.4; }

  .bold-product__price--deleted {
    font-weight: normal;
    font-size: 90%;
    opacity: 0.4;
    text-decoration: line-through; }

.bold-control-group {
  box-sizing: border-box;
  display: block;
  width: 100%; }

.bold-control-group__item {
  display: block;
  vertical-align: bottom;
  text-align: left;
  width: 100%; }

.bold-product__control {
  padding: 15px;
  display: block;
  border-radius: 2px;
  line-height: 1;
  color: inherit;
  border: 1px solid rgba(0,0,0,0.3);
  background-color: rgba(0,0,0,0.03);
  -webkit-appearance: none;
  -moz-appearance: none;
  appearance: none; }

.bold-product__control-label {
  display: inline-block;
  margin-bottom: 3px; }

.bold-product__variant-selector {
  padding-right: 36px;
  background-image: url('data:image/svg+xml;utf-8,');
  background-repeat: no-repeat;
  background-position: right center;
  height: auto;
}

  .bold-product__actions {
    margin-bottom: 0; }

  .bold-product__button,
    .bold-product__button:link,
    .bold-product__button:visited,
    .bold_product__button:hover,
    .bold_product__button:active,
    .bold_product__button:focus {
      text-decoration: none;
      color: inherit; }

    .bold-product__button:hover {
      background-color: rgba(0,0,0,0);
      border-color: rgba(0,0,0,0.2); }

    .bold-product__button:active {
      background-color: rgba(0,0,0,0.05);
      border-color: rgba(0,0,0,0.4); }

.bold-product__quantity-field{
  width: 100%;
}

/* custom css */
{%- comment -%} BOLD-COMMON.LIQUID Last updated: 2018-Aug-9 --------------------------- WARNING --------------------------- This file is auto-generated by BOLD and should not be modified. It may be overwritten and any customizations would be lost. --------------------------- WARNING --------------------------- {%- endcomment -%} <script> {%- comment -%} common data {%- endcomment -%} window.BOLD = window.BOLD || {}; window.BOLD.common = window.BOLD.common || {}; window.BOLD.common.Shopify = window.BOLD.common.Shopify || {}; window.BOLD.common.Shopify.shop = { domain: '{{ shop.domain }}', permanent_domain: '{{ shop.permanent_domain }}', url: '{{ shop.url }}', secure_url: '{{ shop.secure_url }}', money_format: {{ shop.money_format | json }}, currency: {{ shop.currency | json }} }; window.BOLD.common.Shopify.customer = { id: {{ customer.id | json }}, tags: {{ customer.tags | json }}, }; window.BOLD.common.Shopify.cart = {{ cart | json }}; window.BOLD.common.template = '{{ template | split: "." | first }}'; {%- comment -%} common functions {%- endcomment -%} window.BOLD.common.Shopify.formatMoney = function(money, format) { function n(t, e) { return "undefined" == typeof t ? e : t } function r(t, e, r, i) { if (e = n(e, 2), r = n(r, ","), i = n(i, "."), isNaN(t) || null == t) return 0; t = (t / 100).toFixed(e); var o = t.split(".") , a = o[0].replace(/(\d)(?=(\d\d\d)+(?!\d))/g, "$1" + r) , s = o[1] ? i + o[1] : ""; return a + s } "string" == typeof money && (money = money.replace(".", "")); var i = "" , o = /\{\{\s*(\w+)\s*\}\}/ , a = format || window.BOLD.common.Shopify.shop.money_format || window.Shopify.money_format || "$ {% raw %}{{ amount }}{% endraw %}"; switch (a.match(o)[1]) { case "amount": i = r(money, 2, ",", "."); break; case "amount_no_decimals": i = r(money, 0, ",", "."); break; case "amount_with_comma_separator": i = r(money, 2, ".", ","); break; case "amount_no_decimals_with_comma_separator": i = r(money, 0, ".", ","); break; case "amount_with_space_separator": i = r(money, 2, " ", ","); break; case "amount_no_decimals_with_space_separator": i = r(money, 0, " ", ","); break; case "amount_with_apostrophe_separator": i = r(money, 2, "'", "."); break; } return a.replace(o, i); }; window.BOLD.common.Shopify.saveProduct = function (handle, product) { if (typeof handle === 'string' && typeof window.BOLD.common.Shopify.products[handle] === 'undefined') { if (typeof product === 'number') { window.BOLD.common.Shopify.handles[product] = handle; product = { id: product }; } window.BOLD.common.Shopify.products[handle] = product; } }; window.BOLD.common.Shopify.saveVariant = function (variant_id, variant) { if (typeof variant_id === 'number' && typeof window.BOLD.common.Shopify.variants[variant_id] === 'undefined') { window.BOLD.common.Shopify.variants[variant_id] = variant; } }; {%- comment -%} product data {%- endcomment -%} window.BOLD.common.Shopify.products = window.BOLD.common.Shopify.products || {}; window.BOLD.common.Shopify.variants = window.BOLD.common.Shopify.variants || {}; window.BOLD.common.Shopify.handles = window.BOLD.common.Shopify.handles || {}; {%- if template == 'product' -%} window.BOLD.common.Shopify.handle = {{ product.handle | json }} {%- endif -%} {%- comment -%} product page {%- endcomment -%} window.BOLD.common.Shopify.saveProduct({{ product.handle | json }}, {{ product.id | json }}); {%- for variant in product.variants -%}{%- assign csp_metafield_namespace = variant.id | prepend: "csp" -%}window.BOLD.common.Shopify.saveVariant({{ variant.id | json }}, { product_id: {{ product.id | json }}, product_handle: {{ product.handle | json }}, price: {{ variant.price | json }}, group_id: '{{variant.metafields.bold_rp.rp_group_id}}', csp_metafield: {{ product.metafields[csp_metafield_namespace] | json }}});{%- endfor -%} {%- comment -%} BOLD APPS INSTALLED {%- endcomment -%} {%- assign bold_apps_installed = shop | map: 'metafields' | map: 'bold_apps_installed' | first -%} window.BOLD.apps_installed = {{ bold_apps_installed | json }} || {}; {%- unless bold_apps_installed contains 'Customer Pricing' or bold_apps_installed contains 'Product Bundles' or bold_apps_installed contains 'Product Discount' or bold_apps_installed contains 'Quantity Breaks' or bold_apps_installed contains 'Custom Order' or bold_apps_installed contains 'Order Manager' or bold_apps_installed contains 'The Motivator'-%} {%- comment -%} collection page {%- endcomment -%} {%- for product in collection.products -%} window.BOLD.common.Shopify.saveProduct({{ product.handle | json }}, {{ product.id | json }}); {%- for variant in product.variants -%}{%- assign csp_metafield_namespace = variant.id | prepend: "csp" -%}window.BOLD.common.Shopify.saveVariant({{ variant.id | json }}, { product_id: {{ product.id | json }}, product_handle: {{ product.handle | json }}, price: {{ variant.price | json }}, group_id: '{{variant.metafields.bold_rp.rp_group_id}}', csp_metafield: {{ product.metafields[csp_metafield_namespace] | json }}});{%- endfor -%} {%- endfor -%} {%- comment -%} search page {%- endcomment -%} {%- for product in search.results -%} window.BOLD.common.Shopify.saveProduct({{ product.handle | json }}, {{ product.id | json }}); {%- for variant in product.variants -%}{%- assign csp_metafield_namespace = variant.id | prepend: "csp" -%}window.BOLD.common.Shopify.saveVariant({{ variant.id | json }}, { product_id: {{ product.id | json }}, product_handle: {{ product.handle | json }}, price: {{ variant.price | json }}, group_id: '{{variant.metafields.bold_rp.rp_group_id}}', csp_metafield: {{ product.metafields[csp_metafield_namespace] | json }}});{%- endfor -%} {%- endfor -%} {%- endunless -%} {%- comment -%} cart page {%- endcomment -%} {%- for item in cart.items -%}{%- assign csp_metafield_namespace = item.variant_id | prepend: "csp" -%}window.BOLD.common.Shopify.saveVariant({{ item.variant_id | json }}, { product_id: {{ item.product.id | json }}, product_handle: {{ item.product.handle | json }}, price: {{ item.variant.price | json }}, group_id: '{{item.variant.metafields.bold_rp.rp_group_id}}', csp_metafield: {{ item.product.metafields[csp_metafield_namespace] | json }}});{%- endfor -%} {%- comment -%} metafields {%- endcomment -%} window.BOLD.common.Shopify.metafields = window.BOLD.common.Shopify.metafields || {}; {%- assign metafield_namespaces_to_load = 'bold_rp,bold_csp_defaults' | split: ',' -%} {%- for namespace in metafield_namespaces_to_load -%} window.BOLD.common.Shopify.metafields[{{ namespace | json }}] = {{ shop.metafields[namespace] | json }}; {%- endfor -%} window.BOLD.common.cacheParams = window.BOLD.common.cacheParams || {}; </script> {%- comment -%} INCLUDE APP SCRIPTS BELOW {%- endcomment -%}
- Select Save.

Step 2: Edit bold-includes.liquid
Under Snippets, select bold-includes.liquid.
-
Copy and paste the following code into the bottom of the file:
{{ 'bold-upsell.css' | asset_url | stylesheet_tag }}{{ 'bold-upsell-custom.css' | asset_url | stylesheet_tag }} Select Save.
Step 3: Edit theme.liquid
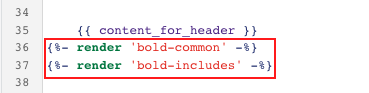
Under Layout, select theme.liquid.
-
Copy and paste the following code directly below the {{ content_for_header }}line:
{%- render 'bold-common' -%}
{%- render 'bold-includes' -%}
Select Save.
Step 4: Edit product.liquid
-
Under Templates, select product.liquid.
Note: The contents for this file may be located under Sections in the product-template.liquid file.
-
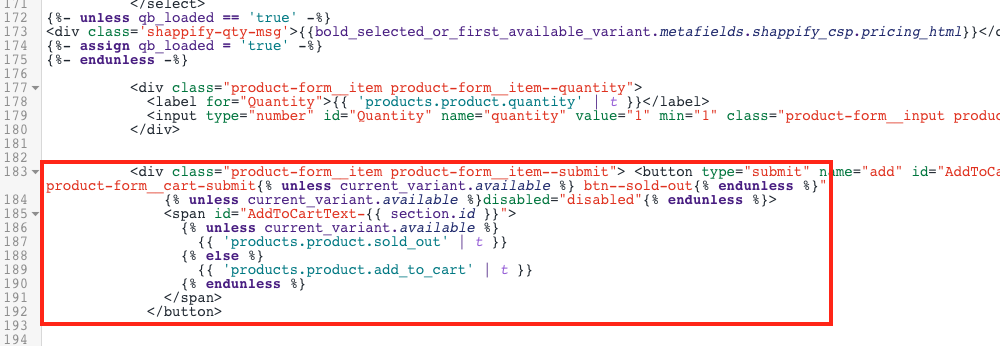
Find the add to cart button.
Note:: Some themes may have an add to cart button outside of the product page, such as a quick view window. Add this code in there as well.
-
Add addtocart to the start of the add to cart button's class name.
Select Save.

Step 5: Edit cart.liquid
-
Under Templates, select cart.liquid.
Note: The contents for this file may be located under Sections in the cart-template.liquid file.
-
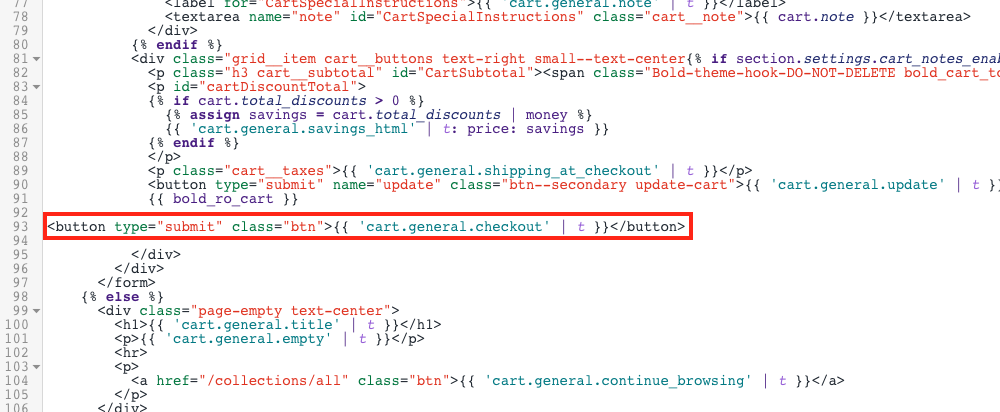
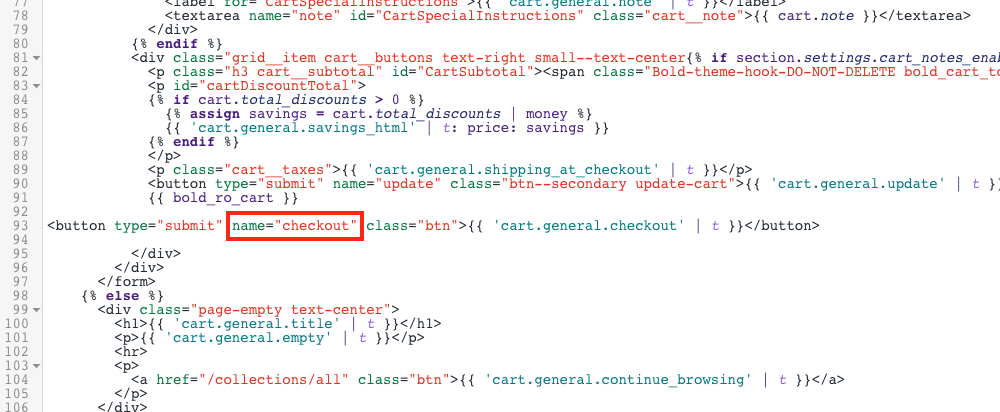
Find the checkout button.
-
Add or update the checkout name to include checkout to the start of the button's name.
Select Save.
Step 6: Edit build cart function
This step is only required if your theme uses an AJAX cart. If you are unsure if you need this step, view the instructions in Test for AJAX functionality below.
-
Create an offer using the Cart Page Pop-Up trigger event.
-
From your Storefront, select the trigger product.
Note: This is the product you have set up to trigger the Upsell offer. Your URL should contain yourstore.myshopify.com/product. This is important for Step 3.
Select Add to Cart.
- If you are not using an AJAX cart, you are redirected to the cart page. Your URL will read: yourstore.myshopify.com/cart and you do not need to continue with these steps.
-
If you are using an AJAX cart, some form of animation occurs that keeps you on the product page. Your URL will still read: yourstore.myshopify.com/product.
Note: Many AJAX cart animations include a cart display showing the inventory in the cart itself. This cart display often has a checkout button which allows the customer to bypass the cart page and go straight to the checkout page.
- If you are using an AJAX cart, continue with these steps:
Select Checkout.
If the upsell does trigger, you don't need any further updates. If the upsell does not trigger, continue with the instructions below.
-
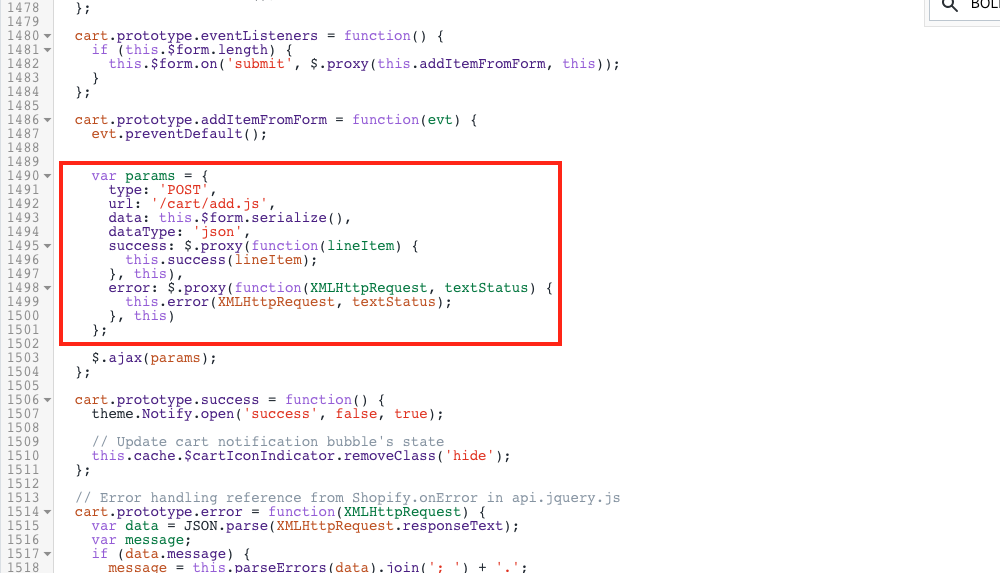
Under Assets, select the file that has the build cart function.
Note: The file where the build function exists can vary between each theme. The following steps below use the Venture theme and has the build function located in its theme.js file.
-
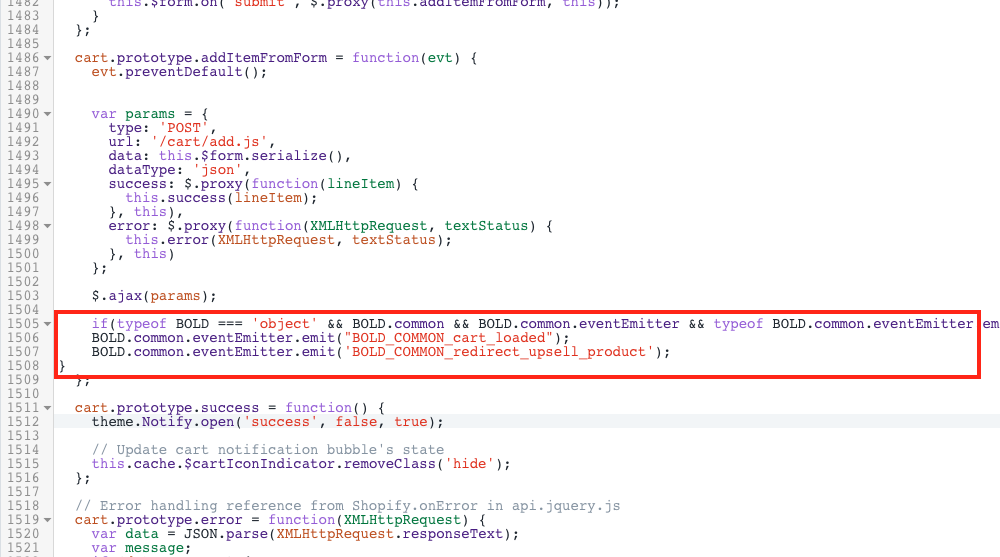
Find the build cart function.
-
Copy and paste the following code into the end of the build cart function:
if(typeof BOLD === 'object' && BOLD.common && BOLD.common.eventEmitter && typeof BOLD.common.eventEmitter.emit === 'function') {
    BOLD.common.eventEmitter.emit("BOLD_COMMON_cart_loaded");
    BOLD.common.eventEmitter.emit('BOLD_COMMON_redirect_upsell_product');
}
Select Save.
Note: If you are experiencing issues with performance on the storefront with Bold Upsell after completing the steps above, we recommend requesting an expert installation. Your theme may require further Liquid code changes. Please speak to our Customer Success team to request an install for Bold Upsell.
Uninstall
If you used the Liquid code to install Upsell to your store, you can remove it by going through the steps above to find their location. If you'd like help with the code removal, please speak to our Customer Success team.
If you installed Upsell after January 4, 2025 using the app embeds, no code removal is needed. Uninstalling the app removes all related theme app extensions.
To cancel your subscription to Bold Upsell and remove the app from your store, please follow the steps below.
From your Shopify admin, click Settings.
Click Apps and sales channels.
Click Uninstall next to Bold Upsell.
Optional: Select a reason for the uninstall.
Click Uninstall.