
Upsell & Bold Discounts Integration
Upsell integrates with Bold Discounts to give you the ability to create Buy One, Get One (BOGO) offers on your site.
Discounts' Duplicate & Hide feature creates duplicate, discounted versions of your store's products that are hidden from the storefront. These hidden products can be offered through Upsell when certain conditions are met. This ensures that the items cannot be purchased on their own, and that the customer must qualify for the discounted item(s) first.
Upsell allows you to set conditions for when this product is offered. You can have the hidden discounted item(s) display when a specific product is added to the cart, when the customer is checking out with certain items, or when the customer's cart is within a defined price range.
For more information on a BOGO offer using Discounts and Upsell, please see the videos below or follow along with the step-by-step setup guide.
Note: This offer type can only be created using Bold Discounts. Discounts Powered by Bold Price Rules does not create duplicate products. If you are using Discounts powered by Bold Price Rules, you can create these BOGOs using Bold Bundles.
Video Walkthrough
Video Walkthrough
Requirements
Both Bold Discounts and Bold Upsell must be installed on the same store prior to the setup steps below. Both apps can be installed through the following links below:
Bold Discounts - Shopify App Store
Bold Upsell - Shopify App Store
Setup
With both apps installed and the duplicate and hide installation completed, please use the following steps to set up a BOGO offer.
Step 1: Create the Discounted Product
From within your Discounts app, select Current Discounts.
Click Create Discount.
Enter a Discount Name (i.e. T-shirt BOGO).
Enter a Discount Amount (discount for the product that is being offered).
Select % or $ next to the "Discount Amount".
Click Select Products.
Select Add next to each of the products you would like to discount.
Note: You can also filter by collection, vendor, and product type.
Click Continue with selected products.
Leave Enable Date Range deselected.
Leave Override cents deselected.
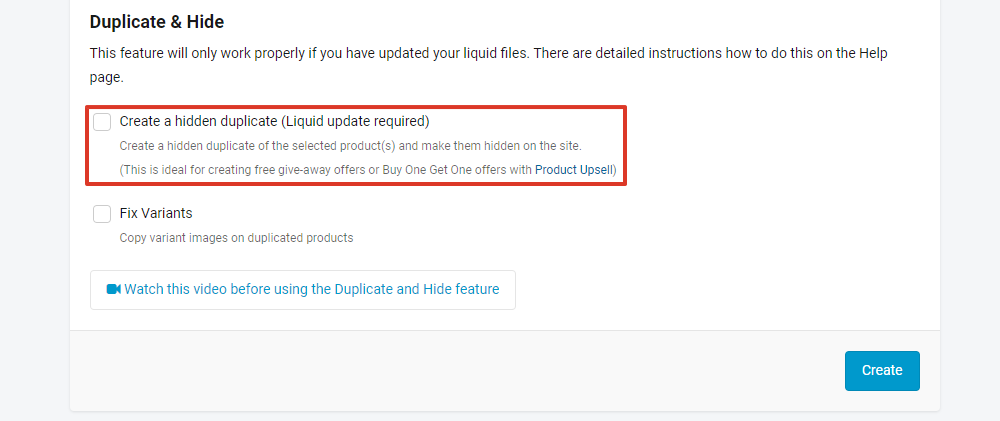
Under Duplicate & Hide select Create a hidden duplicate (Liquid update required).
Click Create.
Click the Toggle to enable the offer.
Note: The toggle is green when the offer is enabled.
Click OK.
Wait for the discount process to complete, then continue with the next steps.
Step 2: Verify the Discounted Products
From Shopify's admin, navigate to Products.
Search for the Product Name (the product you selected in Step 1) using the search bar.
You should see two products here, one at the regular price, and one at the discounted price.
If you can see these two products, continue with the next steps.
Step 3: Create the Cross-Sell Offer
In Bold Upsell, navigate to Manual Offers, and click Create New Offer.
Enter an internal name for your offer.
Click Set a trigger.
Ensure the Trigger Preset field is set to Custom Upsell Trigger.
Select a Trigger location.
Note: Product Page Pop-up is the recommended method.
Select Cross-sell.
Under Trigger products, select one of the two options:
Trigger an upsell on specific products - This option allows you to select specific products to act as the trigger product. If this option is selected, proceed to step #7.
Trigger an upsell on every product - This option sets all products on your store as a trigger for the offer. If this option is selected, skip to step #10.
Click Choose Products and select the products or variants you'd like to trigger the offer.
Click Save Selection.
Optional: Enter a Trigger quantity.
Note: This restricts the offer from showing unless your customers have that amount trigger products in the cart.
Click Set an offer.
Enter an offer Title and Description.
Click Select Products and select your discounted hidden product.
Note: If you are unable to find it with the search feature, select Sync Products in the top of the product selector. Close the window and try again in a few minutes.
Click Save Selection.
Optional: Enable the Offer options.
Note: If you're running a true BOGO offer, we recommend leaving these options unselected.
Optional: Click Set date range and enter a Start and End date.
Optional: Select Set cart price and enter a Min and Max cart total.
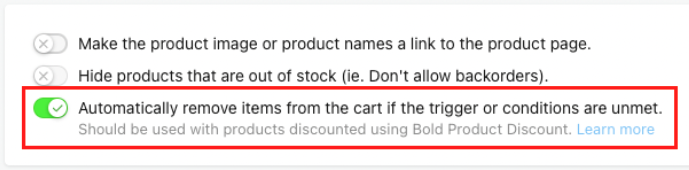
Enable the Automatically remove items from the cart if the trigger or conditions are unmet option.
Note: This option only works if you're using discounted products created through Bold Discounts. The other options in this section are optional.
Click Save Offer.
Lastly, you'll need to test and ensure the offer is working on the storefront. Follow the next steps.
Step 4: Test the Offer
Navigate to the trigger product on the storefront.
Click Add to Cart.
Add the offer to your cart.
Remove the trigger product from your cart.
Did the discounted product also get removed from your cart? If not, please contact our Customer Success team and we'll be happy to help.
Upsell and Bold Discount integration FAQs
Can someone exploit Upsell to get free items when using hidden products created in Bold Discounts?
When using the Upsell and Discount integration, Upsell checks to determine if the user's cart qualifies for the offer before allowing customers to add a free (or discounted) product. However, it is not (and can never be) 100% foolproof due to the way Shopify accepts products and cart adjustments.
When creating the offer in Upsell, you can enable a setting to automatically remove items from the cart if the trigger product is removed or conditions are unmet.
Troubleshooting
Discounted products are visible on the storefront
When a product is placed in a discount group and the discount is activated, Discounts immediately starts applying discounts to the product(s) selected in the discount group.
To hide your discounted products from the storefront, there are two steps that need to be completed:
Visit Bold Discounts Install Instructions to install the duplicate and hide functionality into your theme.
Select the Create a hidden duplicate option in step 12 when you Create a Discount with Bold Discounts.
If both of these steps have been completed and you still see these products on your storefront, a third party app could be causing the issue. Please contact our Customer Success team for further assistance.
Duplicate & hidden products appearing in search results, collection pages, or home page
If a hidden product created from Bold Discounts is appearing on the storefront, there could be a few reasons why this is happening. The most common reasons our team have experienced are the following:
Missing/Incomplete Install - If a theme install has not yet been completed on your store, the hidden products created from Bold Discounts may appear on your storefront. Please visit Bold Discounts Install Instructions for steps on installing Bold Discounts to your theme.
Broken Duplicate & Hidden Product - If a duplicate & hidden product is updated via an inventory sync, product import/export, or any other sync while the discount groups are active in Bold Discounts, this can cause issues resulting in the hidden products appearing on the storefront.
This can be fixed by turning off the discount group(s) where the hidden products were created. Once the sync has been completed, it can then be turned back on.Note After the discount group has been turned off, please double check your products to ensure the duplicate & hidden product(s) have been removed. If the hidden product(s) have not been removed, they need to be manually deleted before re-enabling the discount group in Bold Discounts.
Third Party App Conflict - If a third party app is being used to generate pages on your store, this may cause some issues with duplicate & hidden products appearing on your store. In order to hide duplicate & hidden products on pages that are managed by third party apps, this requires a separate customization on your theme's liquid code.