
Customize Sales Icons & Clock in Bold Discounts
Bold Discounts provides its own optional sales clock and sales icon for you to display on your store. You can customize the color, position, size, and more, for both the sales clock and sales icon.
The sales clock and sales icons can be customized using the app block and app embeds. As vintage themes do not support app blocks, please use the legacy instructions to customize your sales clock if you are using a vintage theme.
To see how to customize your sales clock and sales icon, please view the instructions relevant to the install type you are using on your theme.
Note: The Bold Discounts sales icon and sales clock must be properly installed on your theme before they can appear on your storefront. For step-by-step instructions, please visit our Installation Guide for Bold Discounts.
Customize Sales Clock Walkthrough
Customize Sales Icons Walkthrough
Customizations (via app block & app embed)
Sales clock
To customize the sales clock, please follow the steps below.
Alert: If you are using a vintage theme, please use the Legacy customizations below.
From your Shopify admin, navigate to Online Store > Themes.
Click Customize on the theme you want to customize the sales clock on.
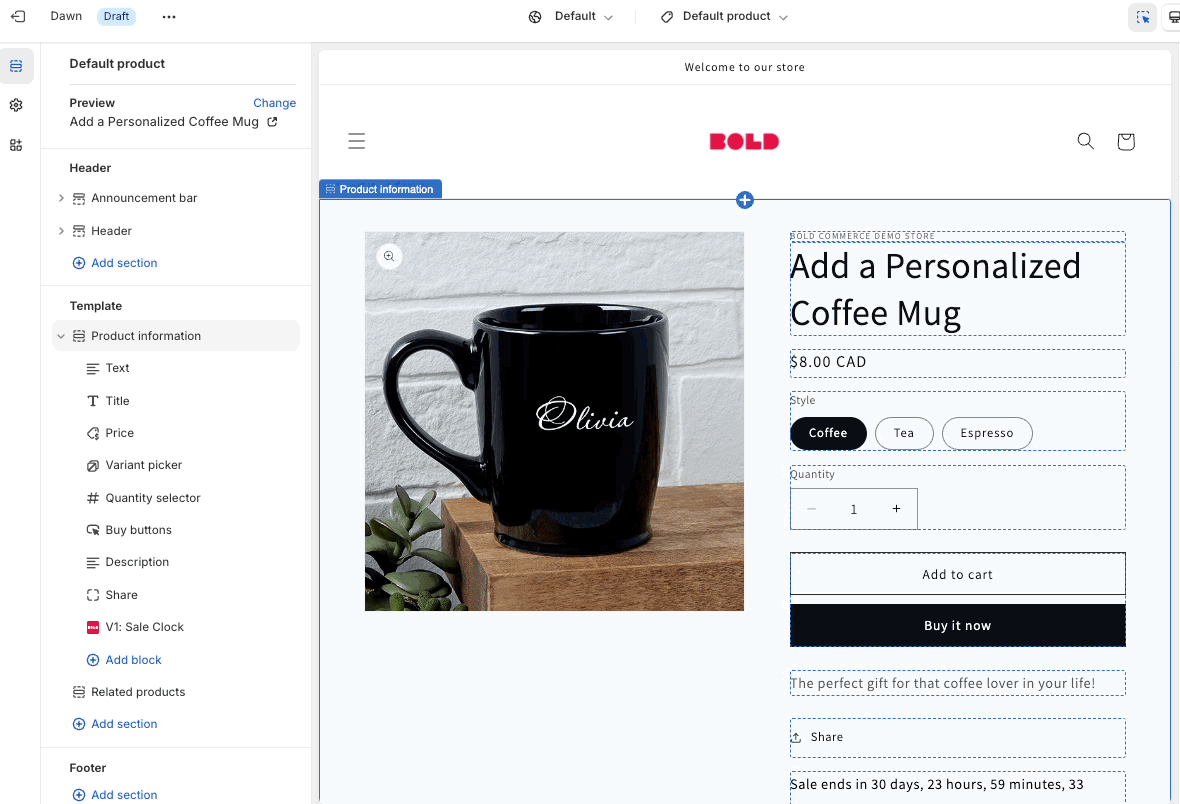
Using the theme’s template menu at the top of the page, select your product template.
If you haven’t already, click Add block on the left side panel and select V1: Sale Clock to add it to your theme.
Change the placement of the sales clock on your product page by dragging and dropping the V1: Sale Clock app block to your preferred position in the template menu.
To change the appearance of the sales clock, use the following app block settings on the right side of the page:
Preview mode - Check this box to see an example of the sales clock in your theme customizer.
Select a template - Use the dropdown to select a clock template design that works best for your store.
Text Align - Click an option to align the text to the left, center, or right side of the Sales Clock container.
Font size - Use the slider to increase or decrease the font size of the Sales Clock.
Font color - Click to select a color for Sales Clock text.
Margin size - Use the slider to create space around the Sales Clock, outside of any defined borders.
Padding size - Use the slider to create space around the Sales Clock, inside of any defined borders.
Border color - Click to select a new border color for the Sales Clock.
Border size - Use the slider to increase or decrease the border size of the Sales Clock text.
Background color - Click to select a new background color for the Sales Clock.
Custom CSS - Enter your own custom CSS into the input box.
Click Save.

Sales icons
Product page sales icons
To customize the sales icon on your product pages, please follow the steps below.
From your Shopify admin, navigate to Online Store > Themes.
Click Customize on the theme you want to customize the sales icon on.
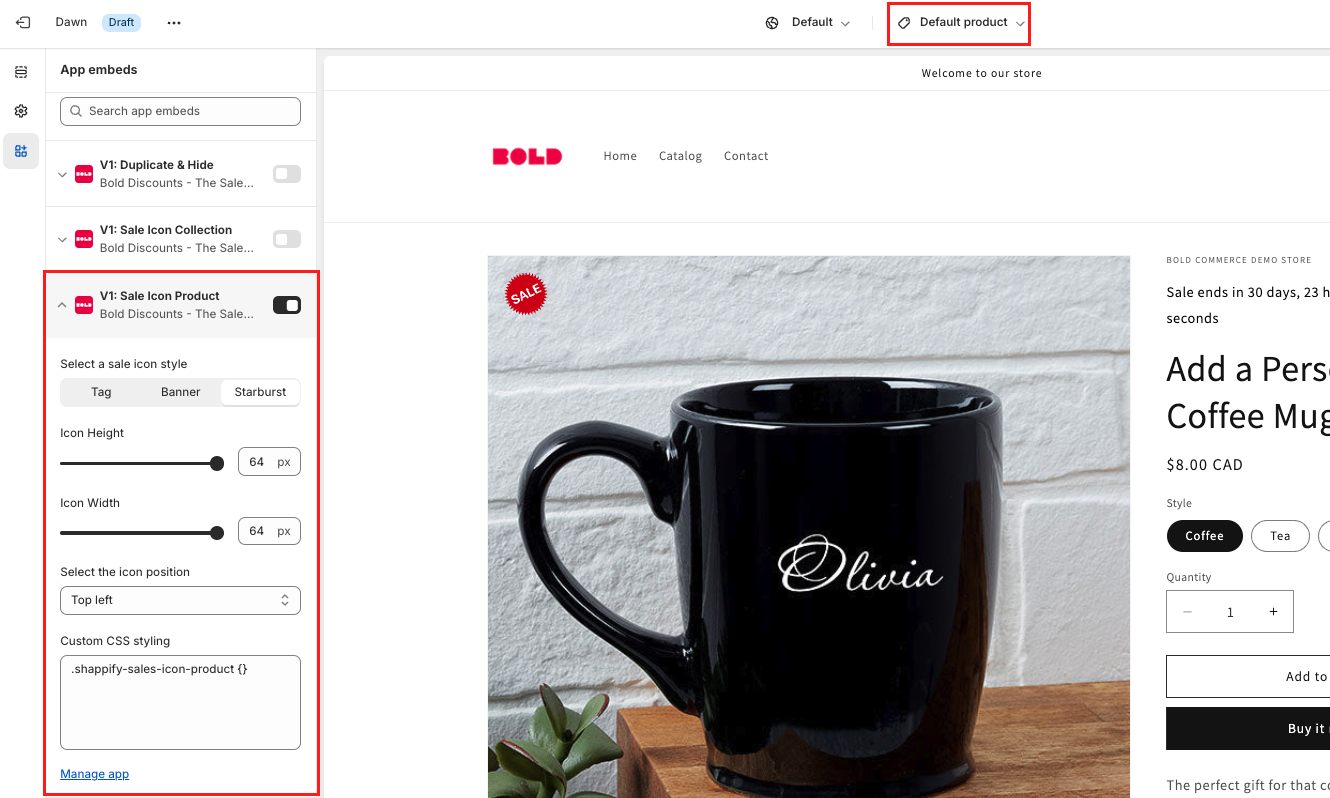
Using the theme’s template menu at the top of the page, select your product template.
If you haven’t already, enable the V1: Sale Icon Product app embed by moving the toggle to the right.
Click the arrow on the V1: Sales Icon Product app embed to expand the settings and adjust the following as needed:
Select a sale icon style - Click on Tag, Banner, or Starburst to select a shape for your sales icon.
Icon Height - Use the slider to increase or decrease the icon’s height.
Icon Width - Use the slider to increase or decrease the icon’s width.
Select the icon position - Use the dropdown menu to select a new position for the sales icon.
Custom CSS styling - Enter your own custom CSS into the input box.
Click Save.
Collection page sales icons
To customize the sales icon on your collection pages, please follow the steps below.
From your Shopify admin, navigate to Online Store > Themes.
Click Customize on the theme you want to customize the sales icon on.
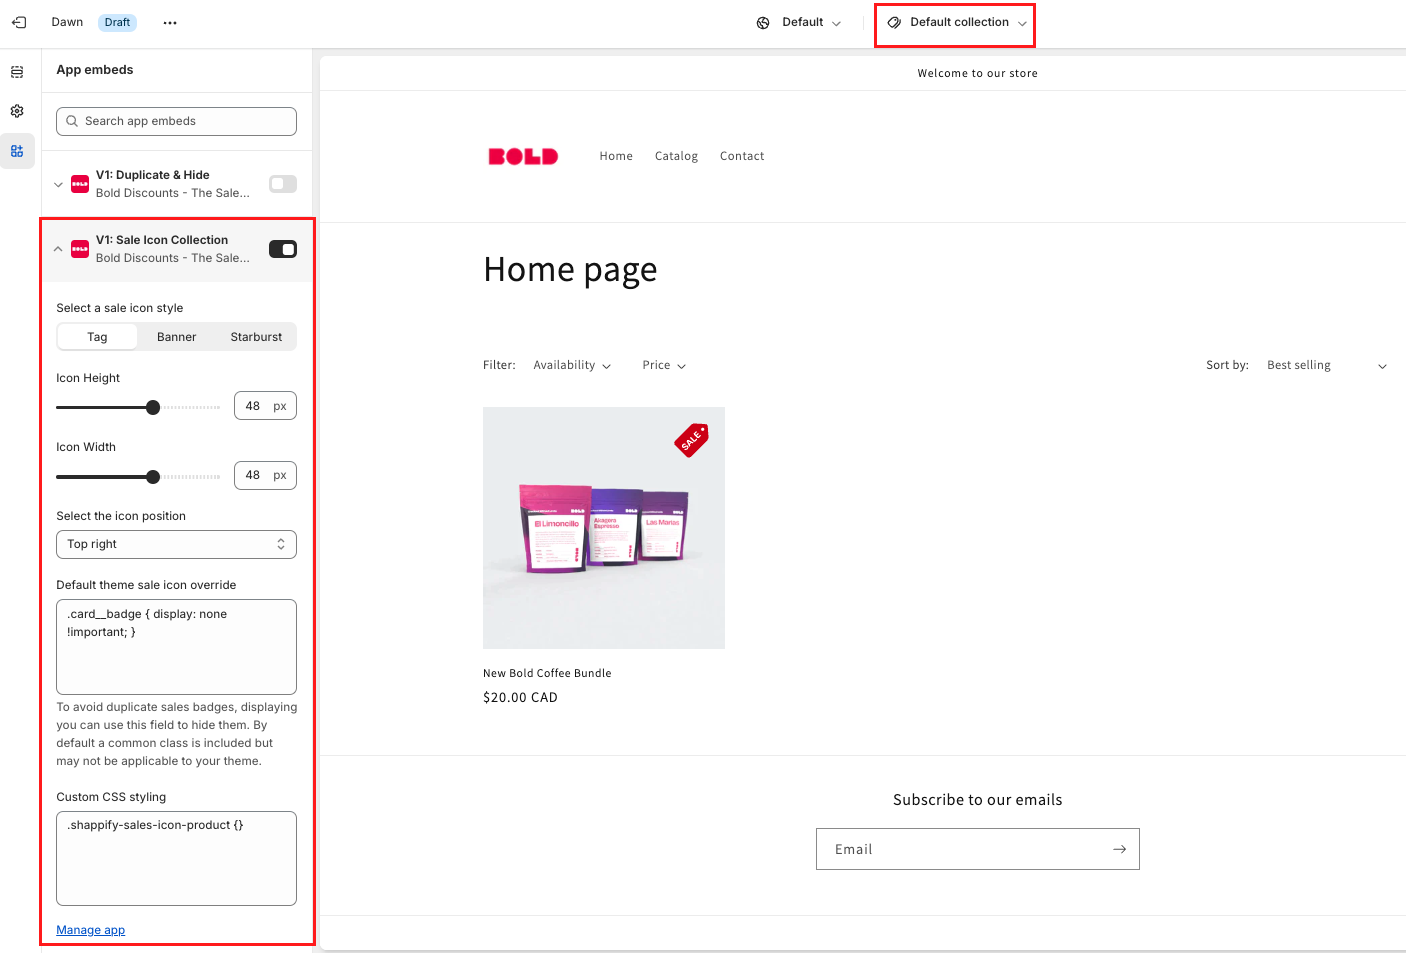
Using the theme’s template menu at the top of the page, select your collection template.
If you haven’t already, enable the V1: Sale Icon Collection app embed by moving the toggle to the right.
Click the arrow on the V1: Sales Icon Collection app embed to expand the settings and adjust the following as needed:
Select a sale icon style - Click on Tag, Banner, or Starburst to select a shape for your sales icon.
Icon Height - Use the slider to increase or decrease the icon’s height.
Icon Width - Use the slider to increase or decrease the icon’s width.
Select the icon position - Use the dropdown menu to select a new position for the sales icon.
Custom CSS styling - Enter your own custom CSS into the input box.
Click Save.
Customizations (legacy)
Note: The following instructions are only relevant to stores who've installed Bold Discounts using the Legacy Liquid Code Installation.
Sales clock
Change the sales clock type and style
From within Discounts, click Sales Clock.
Optional: Change the Sales Clock Type.
Optional: Change the Sales Clock Style.
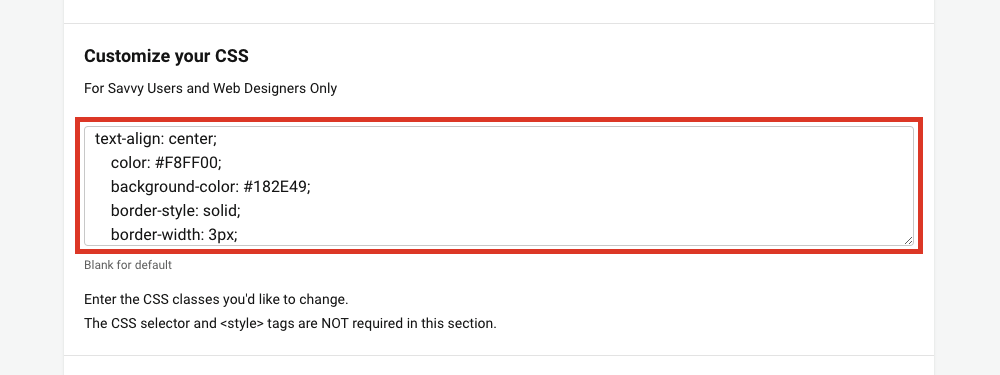
Optional: Enter any Custom CSS as desired.
Note Visit W3 Schools - CSS for more information on CSS styling.
Click Save.
Translate the Sales Clock
Discounts allows you to translate the sales clock into another language to display on your storefront.
Note: The clock can only be translated into one language at a time.
To translate the sales clock from English on your theme, please follow these steps:
From the Shopify admin, navigate to Online Store > Themes.
Duplicate your theme, and work on a backup copy.
Click the ellipsis next to your desired theme, and select Edit code.
Open theme.liquid.
Copy and paste the code below between the head and /head tags
<script>
function shappify_overwrite_sales_clock_text() {
shappify_sale_over_label = "Sale Over";
shappify_sale_ends_in_label = "Sale ends in";
shappify_day_label = "day";
shappify_days_label = "days";
shappify_hour_label = "hour";
shappify_hours_label = "hours";
shappify_minute_label = "minute";
shappify_minutes_label = "minutes";
shappify_second_label = "second";
shappify_seconds_label = "seconds";
}
</script>
Change the text in quotes to the desired translation.
Select Save.
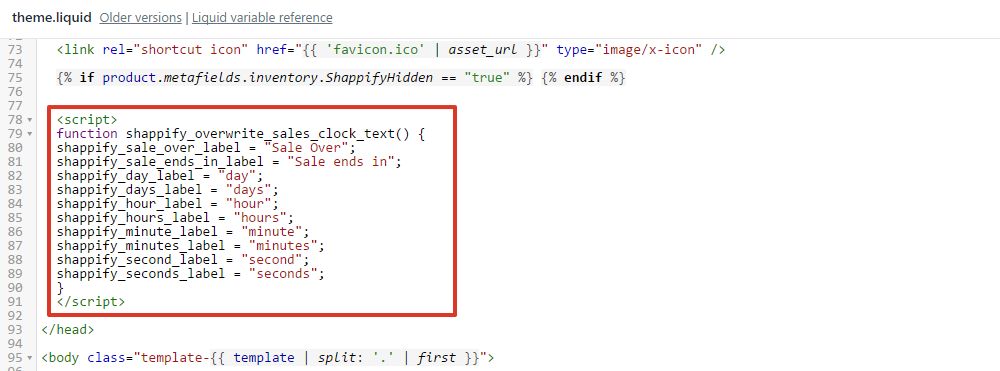
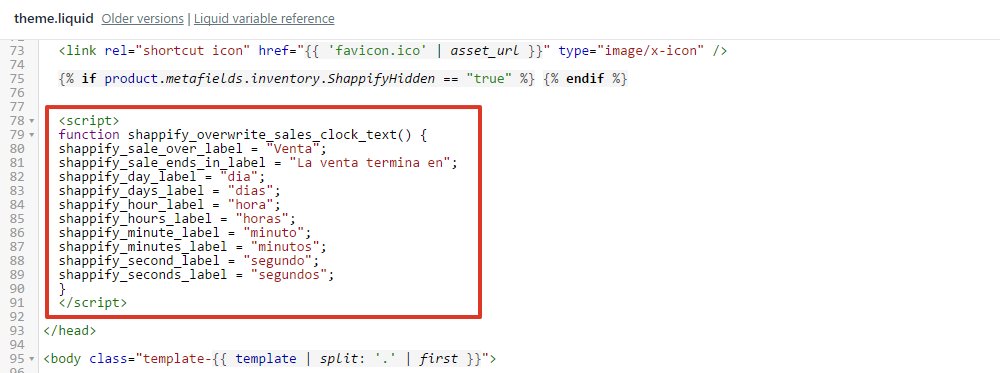
This method may not work with languages using special characters.
Sales icons
Change the sales icon
To change the sales icon to a different style, please follow the steps below.
From within Discounts, click Sales Icon.
Select a new sales icon.
Select Save.
Use a custom sales icon
From the Shopify admin, navigate to Content > Files.
Click Upload files.
Select your custom icon.
Click Open.
Copy the link URL to the image.
From Shopify's admin, select Online Store.
Duplicate your theme, and work on a backup copy.
Click the ellipsis next to your desired theme, and select Edit code.
Under "Snippets", open shappify-sales-icon-product.liquid.
Note: This snippet only appears if you have the Liquid code installation (legacy). For more information, please visit our Installation Guide for Bold Discounts.
Copy and paste the link URL in the img src.
Click Save.
Under "Snippets", open shappify-sales-icon-collection.liquid.
Note: This snippet only appears if you have the Liquid code installation (legacy). For more information, please visit our Installation Guide for Bold Discounts.
Copy and paste the link URL from step 6 in the img src.
Click Save.
If you would like to replace the image with text, replace the entire image code with:
<p>This Item is on Sale!</p>You can change the text to any message you wish to display.


FAQs
Can I change the sales clock style?
Yes. Depending on the theme you are using, the steps for changing the sales clock will vary.
For Online Store 2.0 themes, the sales clock style can be changed in your theme customizer. Please see the steps above under Customizations (via app block and app embed) for changing the sales clock style.
For Vintage themes, the clock style can be changed in the Discounts app admin on the Sales Clock page.
You can also apply CSS styling to the sales clock to change the font color or size.
Visit W3 Schools - CSS for more information on CSS styling.
Can I change the sales icon placement
Yes. The sales icon placement can be changed in your theme customizer. Please see the steps above, under Customizations (via app block and app embed) on changing the sales icon placement.
For stores using the Legacy Liquid Code Installation, the sales icon placement can be adjusted by applying some CSS styling in the Discounts admin on the Sales Icon page.
Visit W3 Schools - CSS for more information on CSS styling.
Can I display the sales clock on the home or collection pages?
No, the sales clock is tied to the product and has been designed to appear on the product page. It cannot display on the home or collection pages.
Discounts uses the product's ID information to determine if it's on sale or not. Discounts is not able to read this information on the home or collection pages.
Can I use my own sales icon?
Using your own sales icon is only available to stores using the Legacy Liquid Code Installation at this time. For instructions on using your own sales icon, please see Customizations (Legacy) > Use a custom sales icon above.
Can the sales icon also appear on the home page of my store?
By default, the sales icon appears on the home page for stores with the current app embed installation.
For stores using the Legacy Liquid Code Installation, the sales icon can be added to discounted products on the homepage in most cases. This would be done by applying the sales icon Liquid code to the image code in your theme.
Please visit Bold Discounts Install Instructions for steps on adding the sales icon to your theme.
Can the sales icon apply on other sales channels?
No, the sales icon only appears on the Online Store sales channel.
Why is the product page showing "Sale is over?"
The sales clock displays based on the meta-fields of the product. If the clock displays Sale is over, it means that the meta-fields of the product were not removed correctly.
The meta-fields can commonly be removed by re-enabling a discount group that has the product having the issue in the discount group, and then disabling the discount group.
If the text remains on the product page, please contact our Customer Success team for further assistance.