Display Regular Prices Beside Wholesale Prices
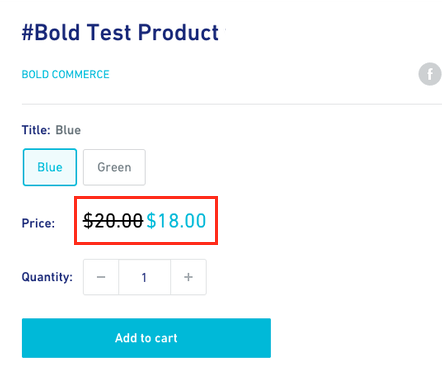
Custom Pricing is designed to show only the wholesale prices to customers who are signed into their account. However, you may want to show both prices (known as compare-at pricing) to your logged in customers. This customization displays the regular price with a strike-through next to the wholesale price to your logged in wholesale customers.
Note: This feature is supported for Custom Pricing Standard Method (V2) and Accelerated Method (V3) only. If you are unsure of the version you are using, please visit Discount Methods and How to Switch.
Please follow the steps relevant to your Custom Pricing version.
Enable compare-at pricing in Custom Pricing V2
From your Shopify admin, navigate to Online Store > Themes.
Click on the Edit theme button next to the theme Custom Pricing is installed on.
Click App embeds icon in the top left corner.
Click on the Bold CSP v2: Prices app embed to expand the settings.
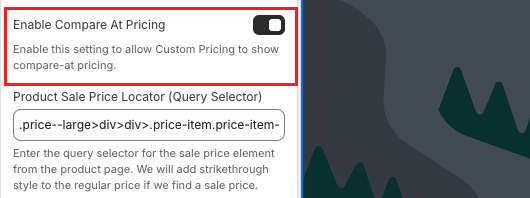
Click on Enable Compare At Pricing.
In the Product Sale Price Locator (Query Selector) field, enter the CSS query selector for the sale price element from your theme's product page.
Note: This is only necessary if you are using a theme other than Horizon. If you need help adjusting the CSS query selector, please reach out to our Customer Success team.
Click Save.

Enable compare-at pricing in Custom Pricing V3
Depending on the method you used to install Custom Pricing, the steps for enabling compare-at pricing differ.
If you have installed Custom Pricing by enabling the app embeds, use the App embed instructions to enable compare-at pricing.
If you have installed Custom Pricing using the Liquid code installation (legacy), then use the Liquid code instructions.
App embed
From your Shopify admin, navigate to Online Store > Themes.
Click on the Edit theme button next to the theme Custom Pricing is installed on.
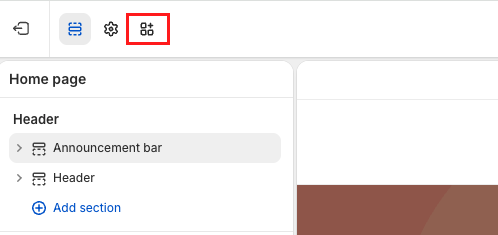
Click the App embeds icon in the top left corner.
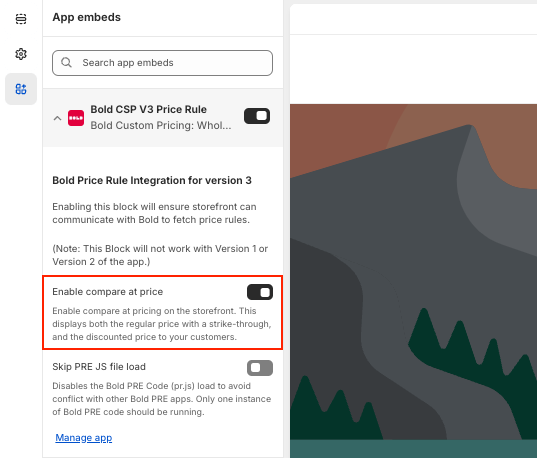
Click on the Bold CSP V3 Price Rule app embed to expand the settings.
Click on the toggle next to Enable compare at price to turn on compare-at-pricing.
Click Save.
Liquid code
These are general instructions that are applicable to the most commonly used vintage themes. Changes to your theme code should be completed on a backup copy of your theme and tested thoroughly to ensure the customization is working before going live.
Alert: Making these changes requires some knowledge of CSS and Liquid code. If you are not comfortable with this, you can reach out to ShopExperts to request a paid customization.
All pages
To display compare at pricing in all areas of your store where your prices are displayed, please complete the steps below.
From the Shopify admin, navigate to Online Store > Themes.
Next to the theme Custom Pricing is installed on, click on the ellipsis (...), and select Edit code.
Note: It is recommended to make a backup copy of the theme you are working on.
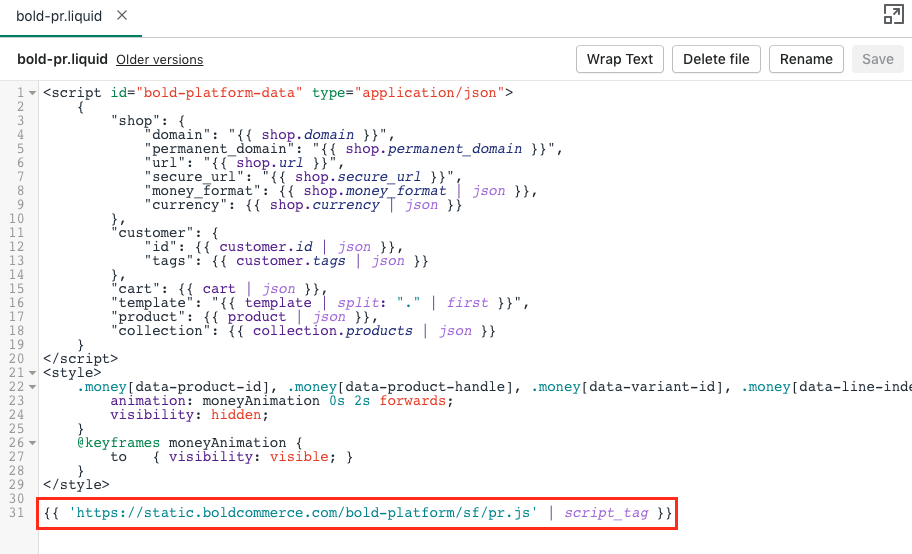
Under Snippets, select bold-pr.liquid.
Find the pr.js script near the bottom of the file.
Copy and paste the following code, placing it above the pr.js script:
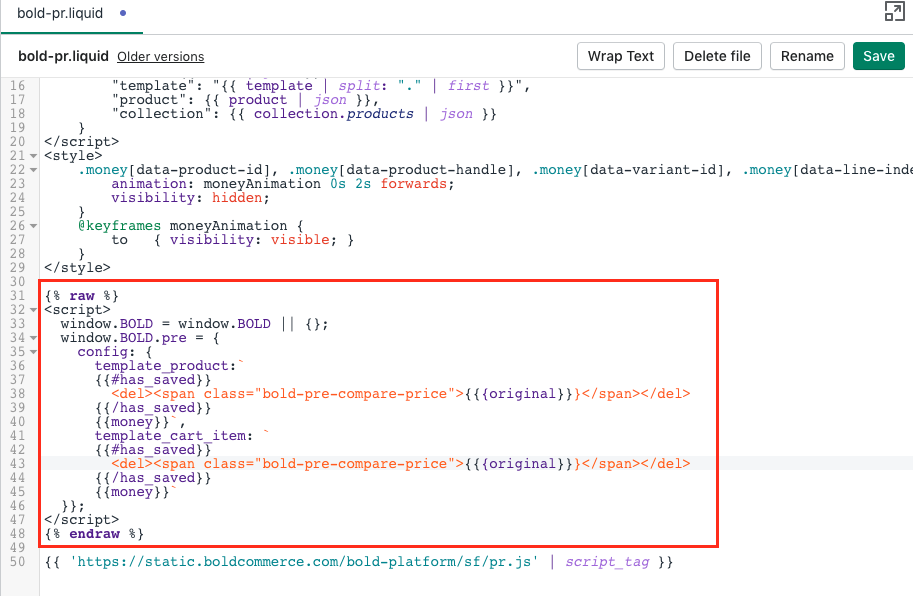
{% raw %}
<script>
window.BOLD = window.BOLD || {};
window.BOLD.pre = {
config: {
template_product:`
{{#has_saved}}
<del><span class="bold-pre-compare-price">{{{original}}}</span></del>
{{/has_saved}}
{{money}}`,
template_cart_item: `
{{#has_saved}}
<del><span class="bold-pre-compare-price">{{{original}}}</span></del>
{{/has_saved}}
{{money}}`
}};
</script>
{% endraw %}
Select Save.
Product page only
To add compare at pricing to your product pages only, please follow the steps below.
From the Shopify admin, navigate to Online Store > Themes.
Next to the theme Custom Pricing is installed on, click on the ellipsis (...), and select Edit code.
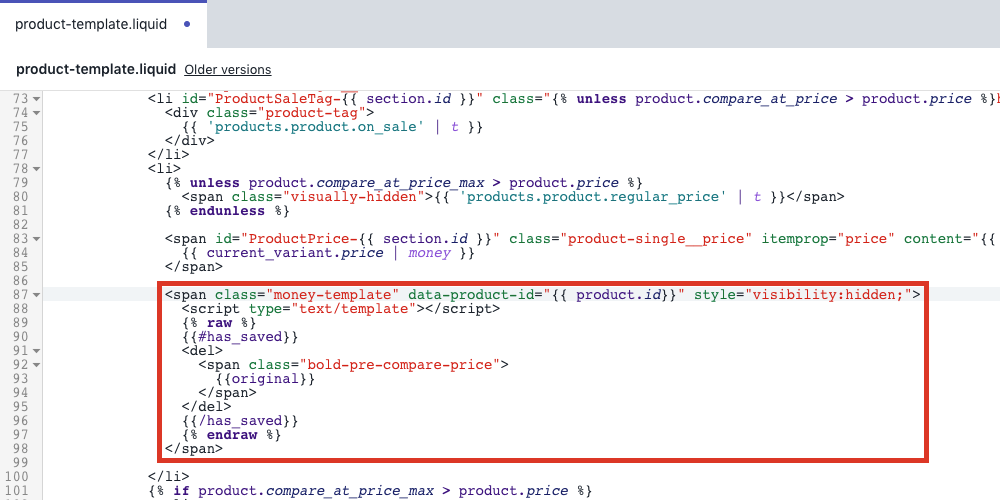
Under Templates, select product.liquid.
Note: If your theme is using Sections, the contents for this file may be located within product-template.liquid.
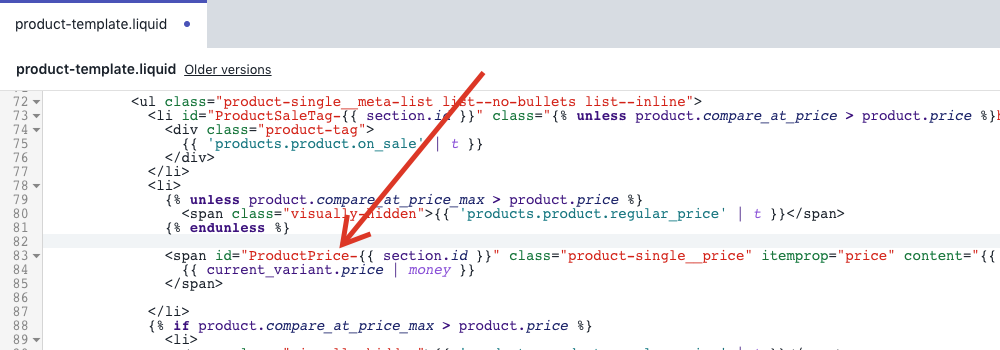
Find each instance of the price code where you want to display your regular prices.
Copy and paste the following code under these price code sections:
<span class="money-template"data-product-id="{{ product.id}}"style="visibility:hidden;">
<scripttype="text/template"></script>
{% raw %}
{{#has_saved}}
<del>
<span class="bold-pre-compare-price">
{{original}}
</span>
</del>
{{/has_saved}}
{% endraw %}
</span>
Repeat Steps 3 - 4 for every instance where you want to show this price.
Select Save.

Collection page only
To add compare at pricing to your collection pages only, please follow the steps below.
From the Shopify admin, navigate to Online Store > Themes.
Next to the theme Custom Pricing is installed on, click on the ellipsis (...), and select Edit code.
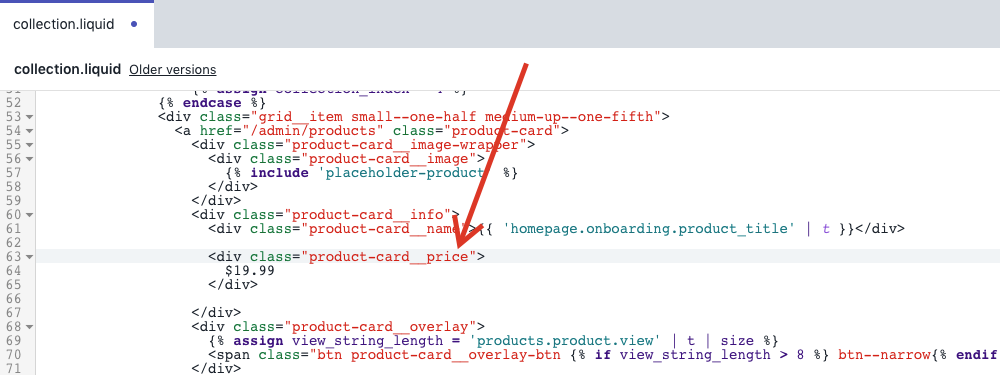
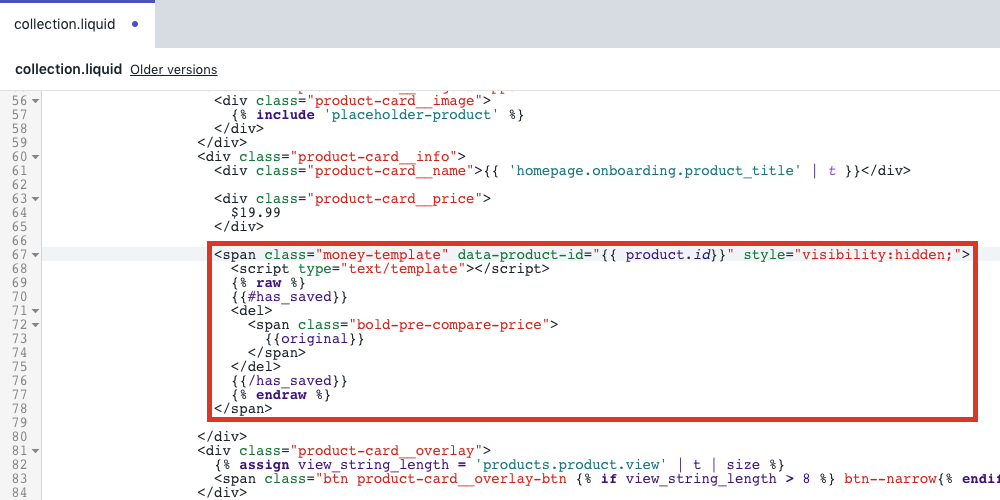
Under Templates, select collection.liquid.
Note: If your theme is using Sections, the contents for this file may be located within collection-template.liquid.
Find each instance of the price code where you want to display your regular prices.
Copy and paste the following code under these price code sections:
<span class="money-template"data-product-id="{{ product.id}}"style="visibility:hidden;">
<scripttype="text/template"></script>
{% raw %}
{{#has_saved}}
<del>
<span class="bold-pre-compare-price">
{{original}}
</span>
</del>
{{/has_saved}}
{% endraw %}
</span>
Repeat Steps 2 - 4 for every instance where you want to show this price.
Select Save.

Cart page only
To add compare at pricing to your cart page only, please follow the steps below.
From the Shopify admin, navigate to Online Store > Themes.
Next to the theme Custom Pricing is installed on, click on the ellipsis (...), and select Edit code.
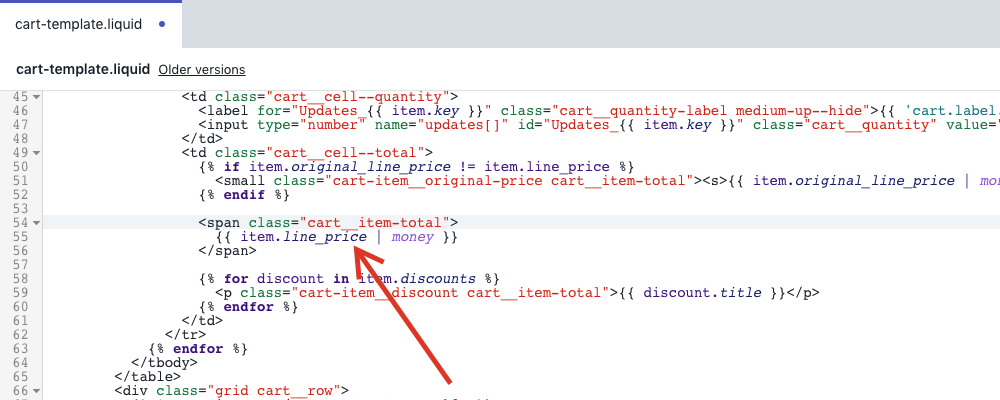
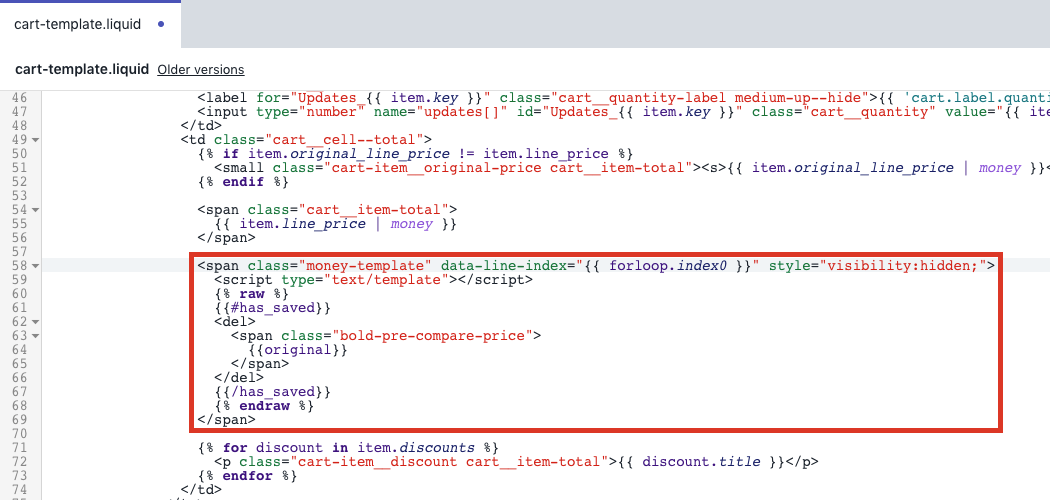
Under Templates, select cart.liquid.
Note: If your theme is using Sections, the contents for this file may be located within cart-template.liquid.
Find each instance of the price code where you want to display your regular prices.
Copy and paste the following code under these price code sections:
<span class="money-template"data-line-index="{{ forloop.index0 }}"style="visibility:hidden;">
<scripttype="text/template"></script>
{% raw %}
{{#has_saved}}
<del>
<span class="bold-pre-compare-price">
{{original}}
</span>
</del>
{{/has_saved}}
{% endraw %}
</span>
Repeat Steps 2 - 3 for every instance where you want to show this price.
Select Save.

CSS styling
Once the above customizations have been completed, you can further style the prices so they appear side-by-side with the compare at price in a different colour.
From the Shopify admin, navigate to Online Store > Themes.
Next to the theme Custom Pricing is installed on, click on the ellipsis (...), and select Edit code.
Under Assets, select Add a new asset.
Select Create a blank file.
Name the file bold-custom.CSS
Copy and paste the following code into the file:
Note: You need to add your own color number for the color you wish to use.
.money-details {
  color:#000;
}

.money-details, .pre-money {
  display: inline !important;
  padding-right: 2%;
}
Select Save.
Under Layout, select theme.liquid.
Copy and paste the following code below content_for_header:
{%- render 'bold-pr' -%}
{{ 'bold-custom.css' | asset_url | stylesheet_tag }}
Select Save.
Example:
After CSS customization: