
Gorgias and Subscriptions for Shopify Checkout Integration
Gorgias is a customer support platform that enables businesses to manage support requests from multiple channels such as email, live chat, and social media.
Bold Subscriptions and Gorgias integrate to streamline customer support. This integration allows support agents to view customer subscription information within Gorgias and perform actions like skipping, canceling, and pausing subscriptions, leading to more efficient customer service.
Example
This guide details how to set up the integration between Gorgias and Bold Subscriptions.
Pricing
Gorgias has a variety of price plans based on the number of help desk tickets your business requires. Plans can be paid monthly or yearly. For more information, please visit Gorgias’ pricing page.
Prerequisites
A Bold Subscriptions API access token with Read & Write permissions. Use the following links for instructions:
A Bold {Shop Identifier}. Get your shop identifier using your access token generated in the above step, or reach out to our Customer Success team to provide it.
Setup
Step 1: Connect Gorgias to Bold Subscriptions
To establish the connection and enable Gorgias to retrieve subscription information using the customer's email, follow the steps below.
Log into your Gorgias account.
-
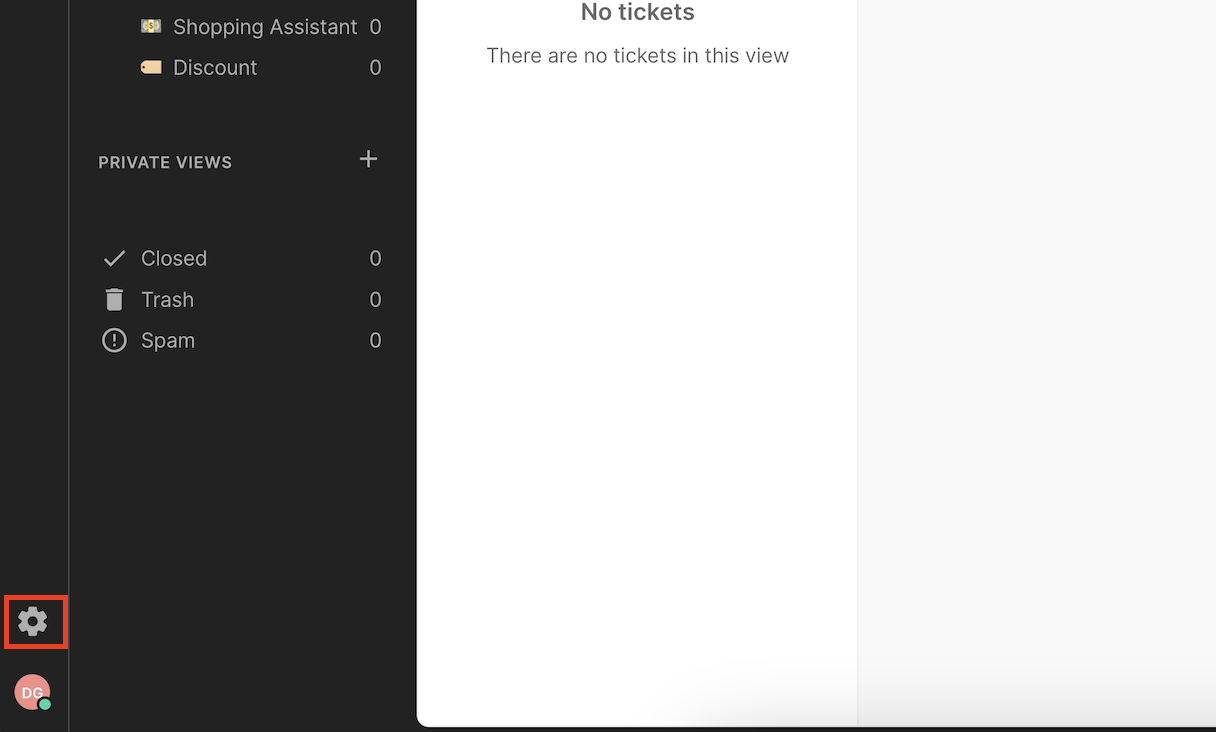
Navigate to Settings by clicking the gear icon at the bottom of the left sidebar.
-
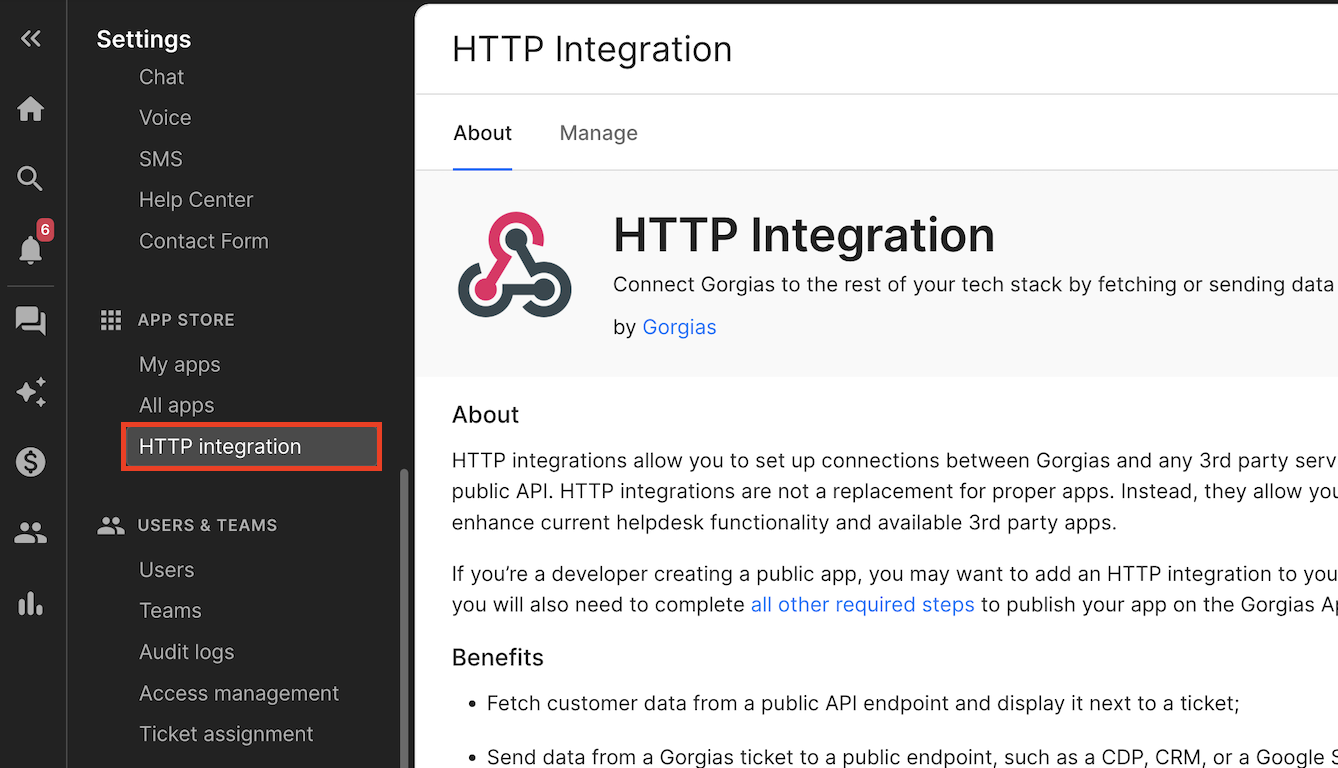
In the new menu, select App Store, then HTTP Integration.
-
Click the Manage tab located at the top of the page.
Click the blue Add HTTP Integration button in the top right corner.
-
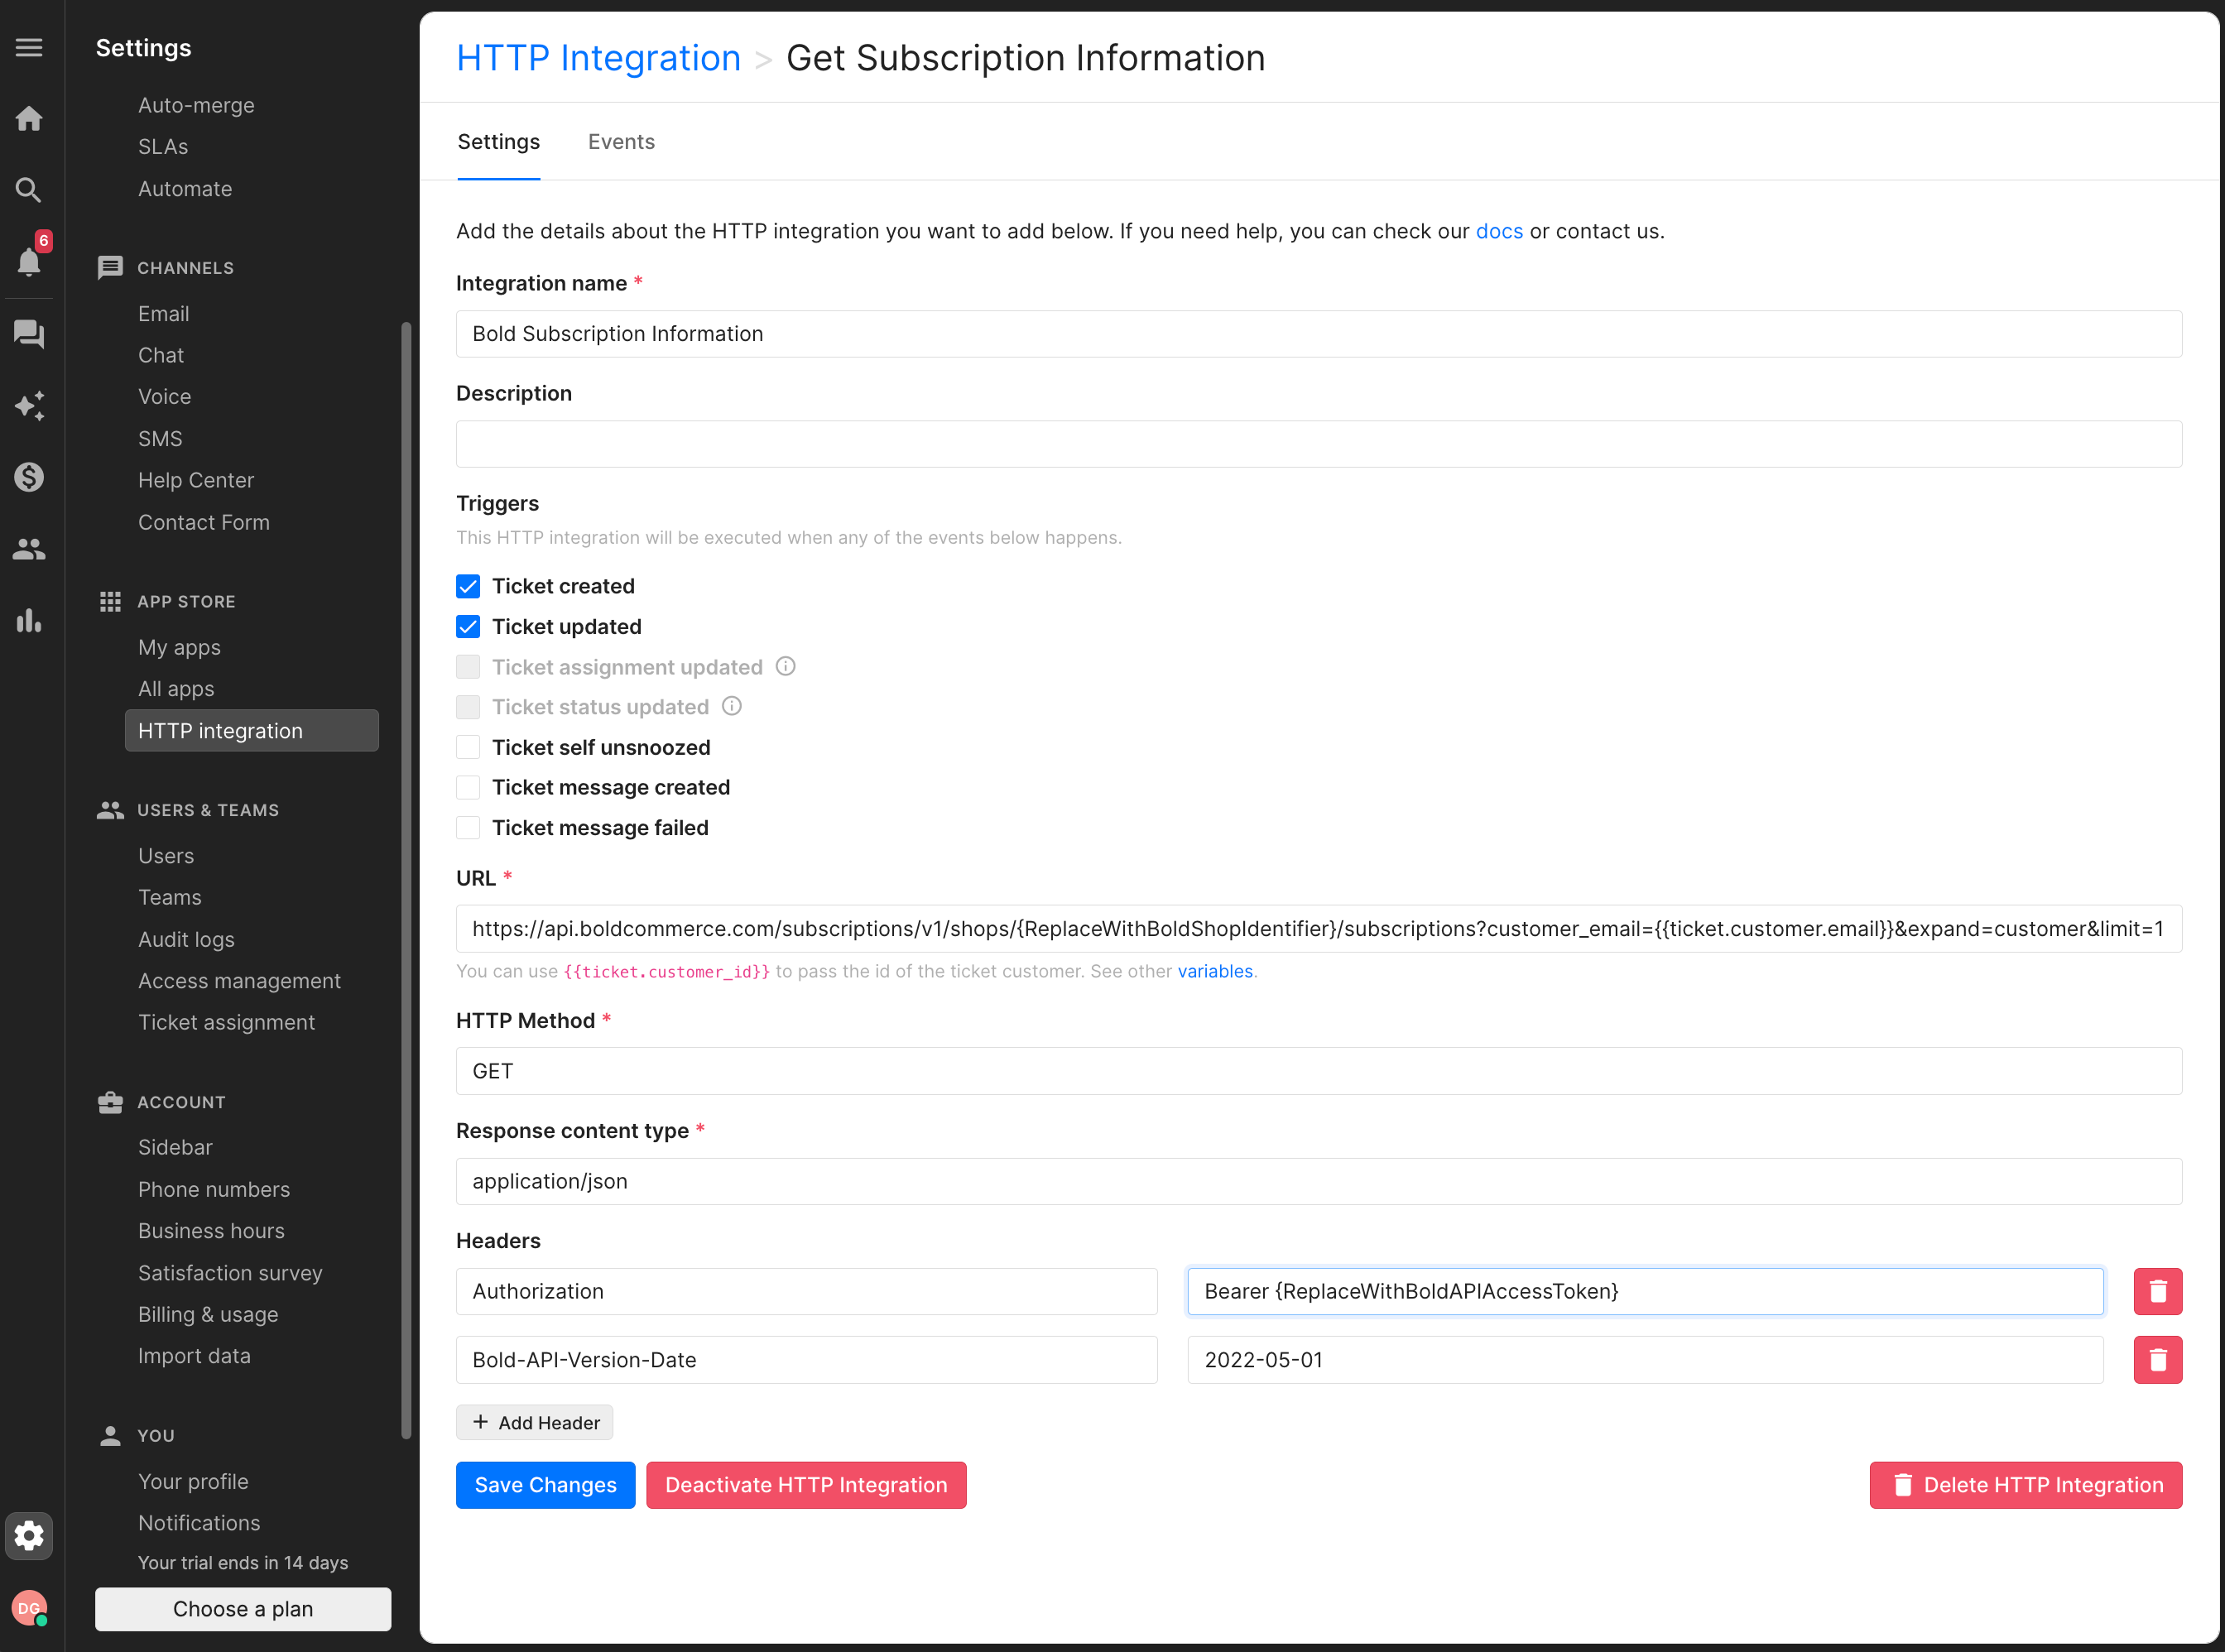
Complete the following fields:
-
Integration Name: Enter Bold Subscription Information (or your preferred name).
Note: This name can be whatever you want, but for the purposes of this article it will be referenced as Bold Subscription Information.
Optional: Enter a Description.
Triggers: Select Tickets created and Tickets updated. Choose additional triggers as needed.
-
URL: Copy and paste the following web address, but replace {Bold Shop Identifier} with your store's Bold shop identifier:
https://api.boldcommerce.com/subscriptions/v1/shops/{Bold Shop Identifier}/subscriptions?customer_email={{ticket.customer.email}}&expand=customer&limit=1 HTTP Method: Enter GET.
Response content type: Enter application/json.
Headers:
- Key: Authorization
- Value: Bearer {ReplaceWithBoldAPIAccessToken}
- Key: Bold-API-Version-Date
- Value: 2022-05-01
-
Click Save changes.

Step 2: Verify the integration
To ensure the integration is functioning correctly, follow the steps below.
Click the Home button in the top left corner.
Click Create Ticket.
-
Enter the email address of a test customer with an active subscription in your store.
Note: This should be a test account so you can access the email.
- Reply to the Gorgias ticket message from the associated email account.
-
Click the Settings gear icon in the bottom left corner.
Select HTTP Integration.
Click Manage.
Click on the Bold Subscription Information integration.
Click Events at the top of the page.
Click on an event to view the details.
Verify that the displayed information matches the subscription details of the test customer.
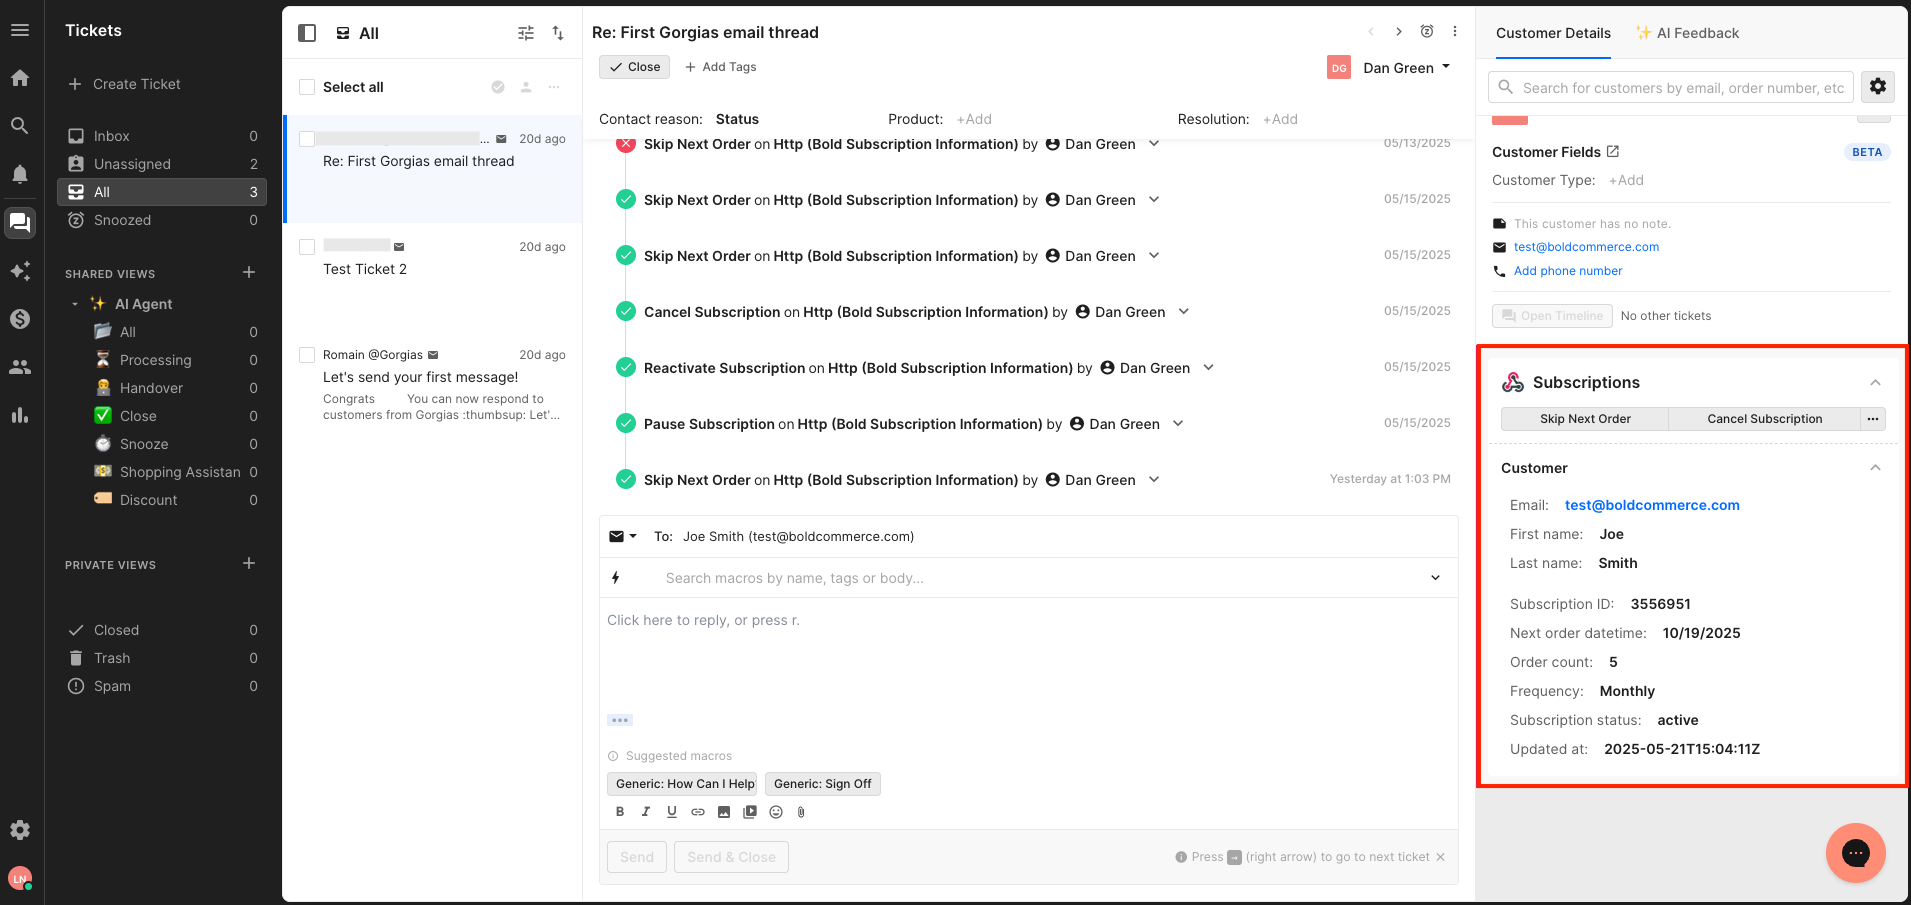
Step 3: Display the Subscription widget on tickets
To make subscription information available visible within customer tickets, follow the steps below.
Click on All in the ticket navigation.
Click on a recent ticket thread that had an event trigger from the Bold Subscription Information integration.
-
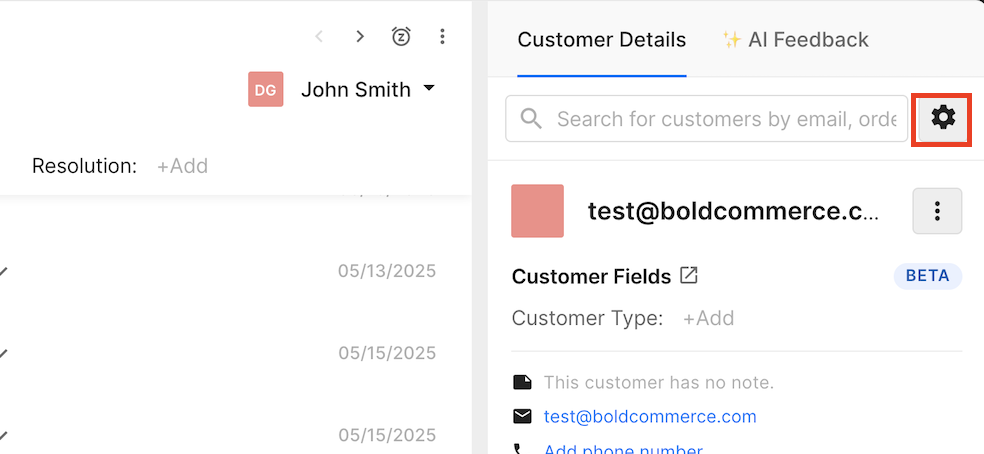
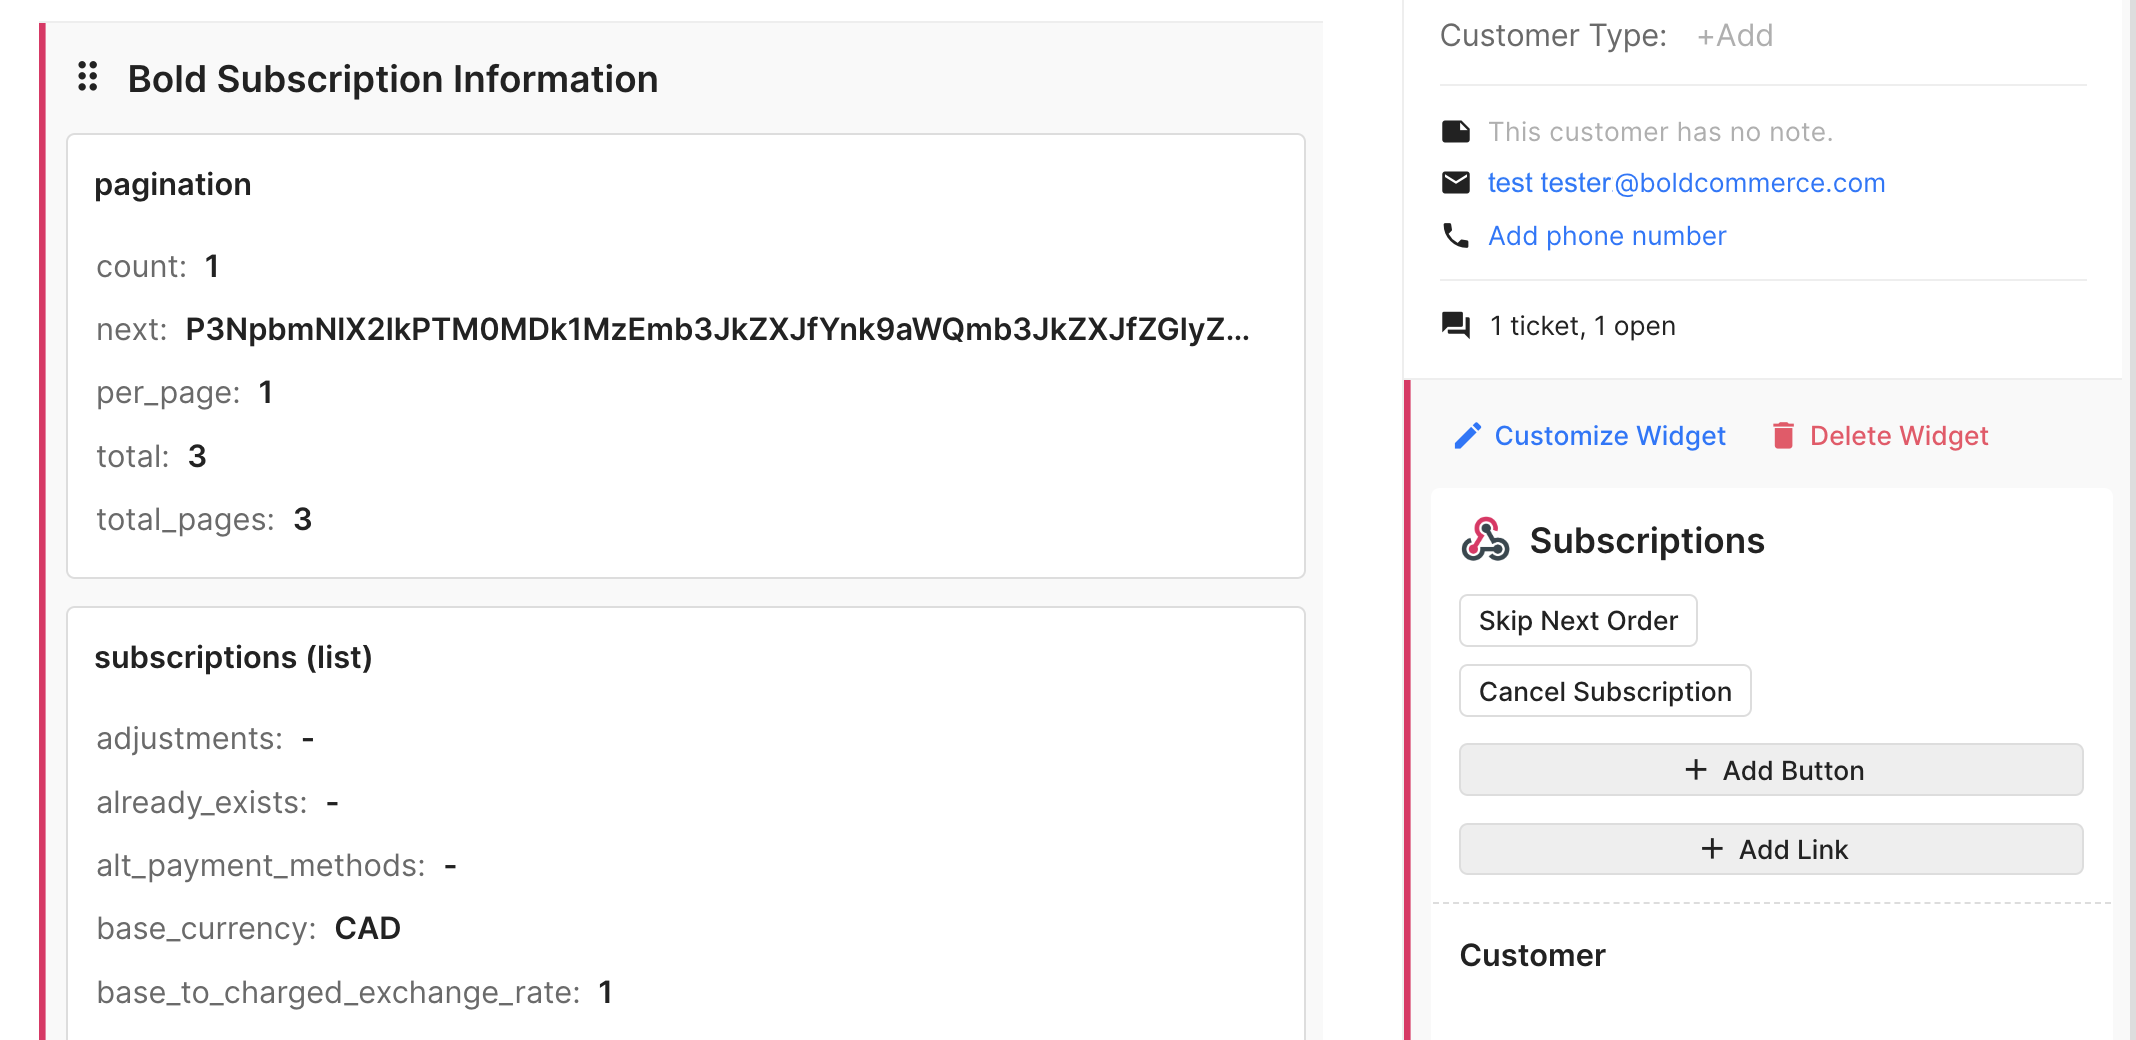
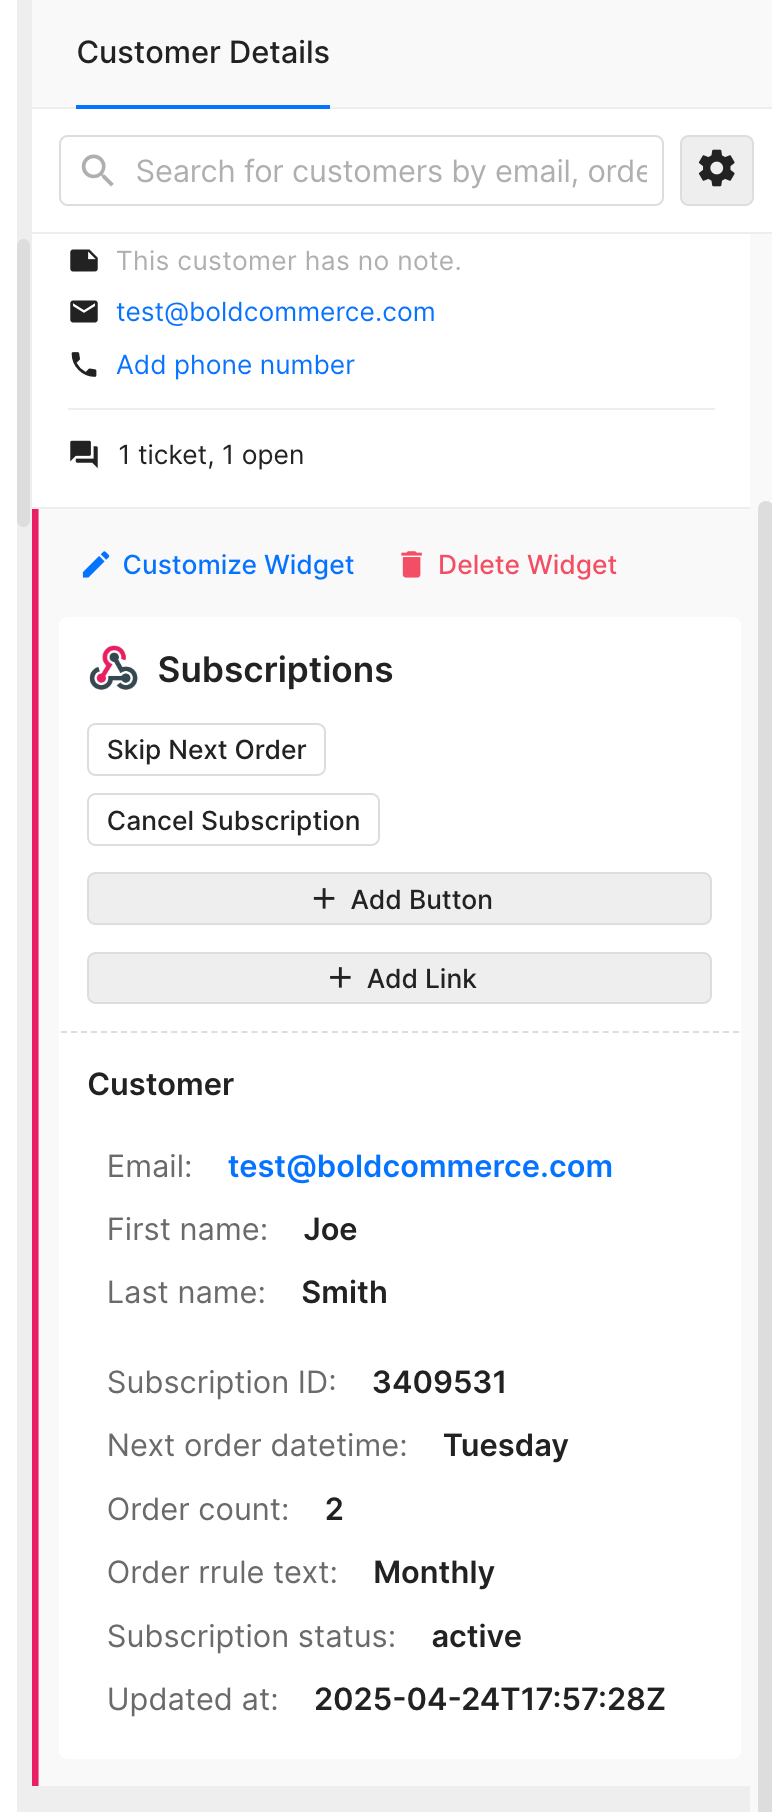
Under Customer Details, click the Settings gear icon. This will open the Manage Widgets page.
Scroll down the left sidebar until you locate Bold Subscription Information.
-
Drag subscription (list) from the left side to the right side, where widgets are displayed.
Note: The pagination section is not required.
-
Remove any unnecessary fields, and customize the field names as desired (e.g., change first_name to First Name, change the widget title to Subscriptions, etc.)
Step 4: Add Bold Subscriptions action buttons to the widget
To add action buttons within the widget for quick actions like skipping an order, please follow the steps below.
Click on All in the ticket navigation.
Click on a recent ticket thread that had an event trigger from the Bold Subscription Information integration.
-
Under Customer Details, click the Settings gear icon. This will open the Manage Widgets page.
On the left sidebar, locate the Subscription widget that you previously added.
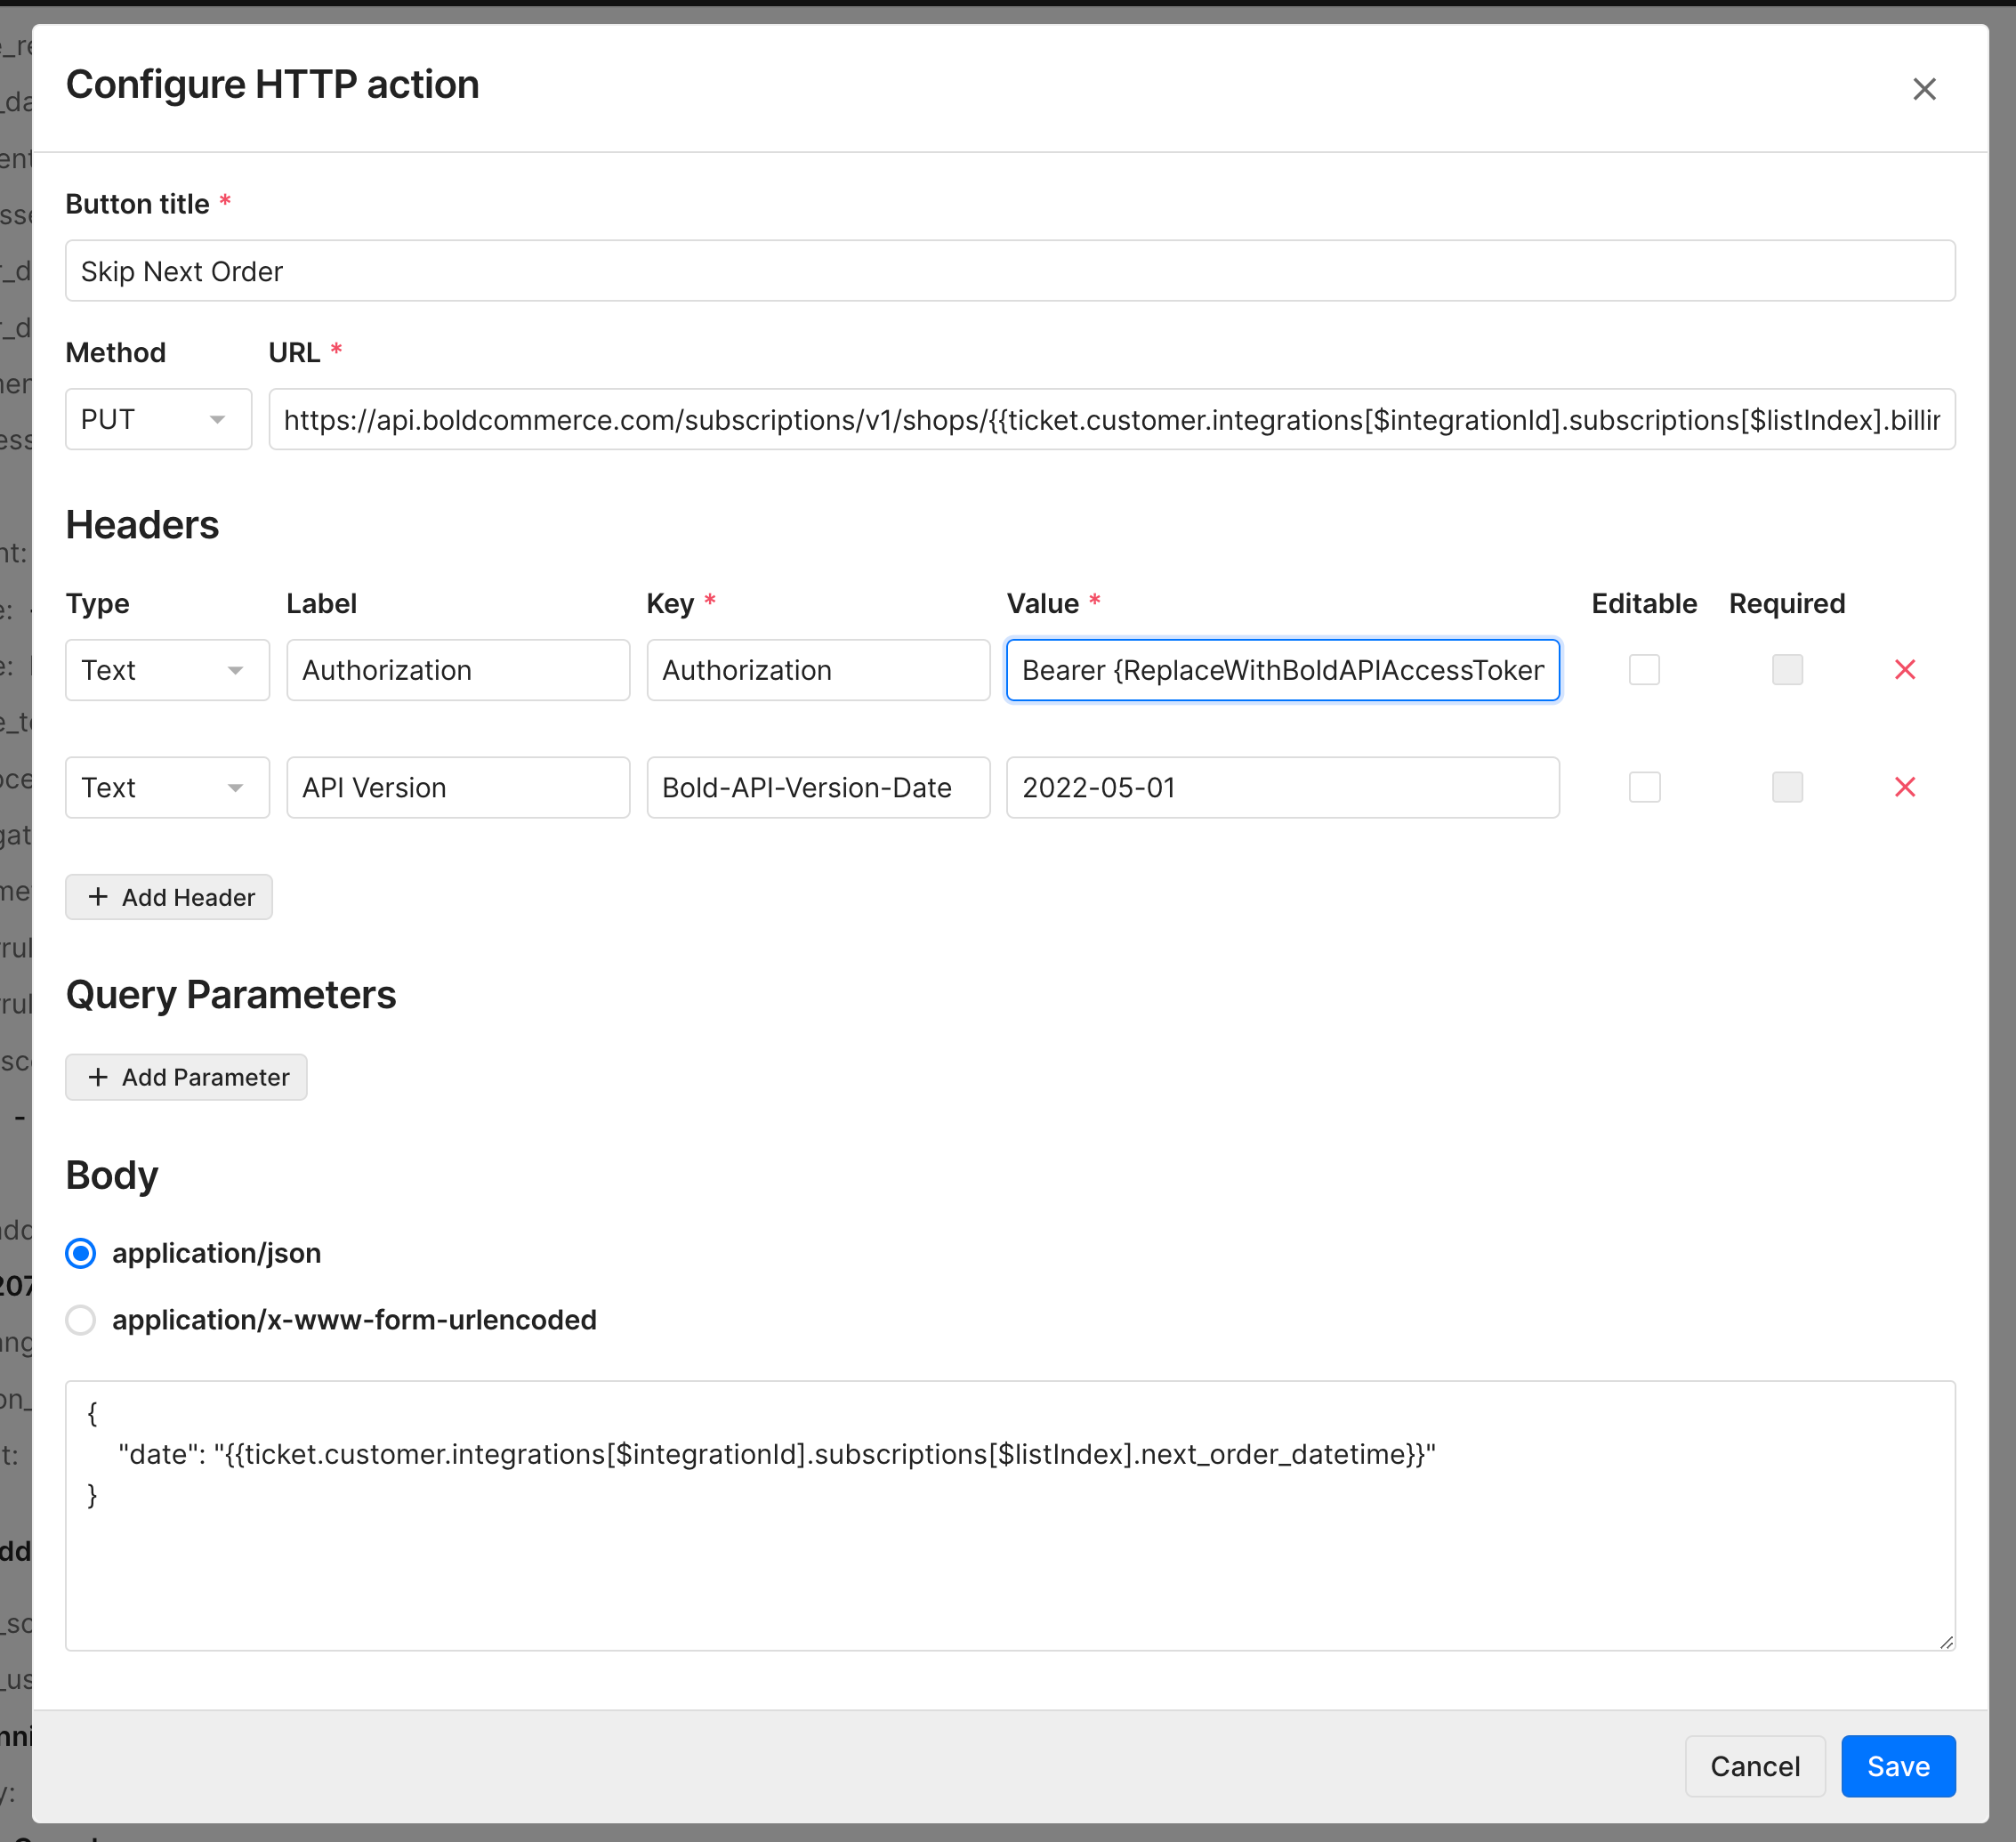
Click Add Button. An HTTP action configuration window will appear.
- Create actions for any function supported by the Bold Subscriptions API. For example:
-
To create a Skip Next Order button, configure the following:
Button Title: Enter Skip Next Order.
Method: Select PUT.
-
URL: Copy and paste the following web address:
https://api.boldcommerce.com/subscriptions/v1/shops/{{ticket.customer.integrations[$integrationId].subscriptions[$listIndex].billing_address.shop_identifier}}/subscriptions/{{ticket.customer.integrations[$integrationId].subscriptions[$listIndex].id}}/skip Headers:
-
Authorization
- Type: Text
- Label: Authorization
- Key: Authorization
- Value: Bearer {ReplaceWithBoldAPIAccessToken}
- Leave the Editable and Required checkboxes in their default state.
-
Authorization
API Version
- Type: Text
- Label: API Version
- Key: Bold-API-Version-Date
- Value: 2022-05-01
- Leave the Editable and Required checkboxes in their default state.
Query Parameters: Leave this section empty.
Body:
- Select application/json.
-
Enter the following code:
{
    "date": "{{ticket.customer.integrations[$integrationId].subscriptions[$listIndex].next_order_datetime}}"
}
-
Click Save.
More buttons can be added using a similar format. The section below offers more examples.

More subscription action button examples
Cancel subscription button
Button Title: Enter Cancel Subscription.
Method: Select POST.
-
URL: Copy and paste the following web address:
https://api.boldcommerce.com/subscriptions/v1/shops/{{ticket.customer.integrations[$integrationId].subscriptions[$listIndex].billing_address.shop_identifier}}/subscriptions/{{ticket.customer.integrations[$integrationId].subscriptions[$listIndex].id}}/cancel Headers:
-
Authorization
- Type: Text
- Label: Authorization
- Key: Authorization
- Value: Bearer {ReplaceWithBoldAPIAccessToken}
- Leave the Editable and Required checkboxes in their default state.
-
Authorization
API Version
- Type: Text
- Label: API Version
- Key: Bold-API-Version-Date
- Value: 2022-05-01
- Leave the Editable and Required checkboxes in their default state.
Query Parameters: Leave this section empty.
Body:
- Select application/json.
- No additional parameters are needed.
Click Save.
Reactivate subscription button
Button Title: Enter Reactivate Subscription.
Method: Select POST.
-
URL: Copy and paste the following web address:
https://api.boldcommerce.com/subscriptions/v1/shops/{{ticket.customer.integrations[$integrationId].subscriptions[$listIndex].billing_address.shop_identifier}}/subscriptions/{{ticket.customer.integrations[$integrationId].subscriptions[$listIndex].id}}/activate Headers:
-
Authorization
- Type: Text
- Label: Authorization
- Key: Authorization
- Value: Bearer {ReplaceWithBoldAPIAccessToken}
- Leave the Editable and Required checkboxes in their default state.
-
Authorization
API Version
- Type: Text
- Label: API Version
- Key: Bold-API-Version-Date
- Value: 2022-05-01
- Leave the Editable and Required checkboxes in their default state.
Query Parameters: Leave this section empty.
Body:
- Select application/json.
- No additional parameters are needed.
Click Save.
Pause subscription button
Button Title: Enter Reactivate Subscription.
Method: Select POST.
-
URL: Copy and paste the following web address:
https://api.boldcommerce.com/subscriptions/v1/shops/{{ticket.customer.integrations[$integrationId].subscriptions[$listIndex].billing_address.shop_identifier}}/subscriptions/{{ticket.customer.integrations[$integrationId].subscriptions[$listIndex].id}}/pause Headers:
-
Authorization
- Type: Text
- Label: Authorization
- Key: Authorization
- Value: Bearer {ReplaceWithBoldAPIAccessToken}
- Leave the Editable and Required checkboxes in their default state.
-
Authorization
API Version
- Type: Text
- Label: API Version
- Key: Bold-API-Version-Date
- Value: 2022-05-01
- Leave the Editable and Required checkboxes in their default state.
Query Parameters: Leave this section empty.
Body:
- Select application/json.
- No additional parameters are needed.
Click Save.