
Create a Standard Subscription Group
Standard subscription groups allow you to offer regular pay-as-you-go subscriptions to your customers. You can choose which products you would like to offer to your customers as a subscription, add the frequency options, and set up discounts for an extra incentive to subscribe.
This article provides step-by-step instructions on how to set up a standard subscription group.
Video Walkthrough
Functionality
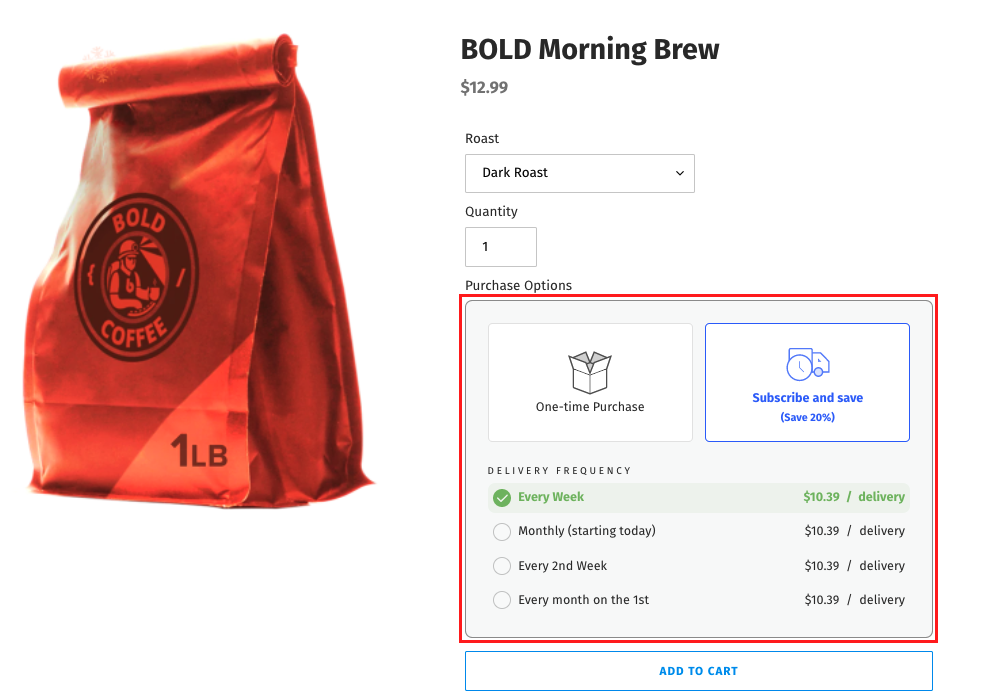
Once a subscription group has been created and activated within Bold Subscriptions, a subscription widget appears on the product page.
Using the options in the subscription widget, customers can either choose to subscribe at a particular frequency, or purchase the product one time.
Example
Setup
When creating your subscription groups, you will be presented with multiple features that can be enabled within the group. For an explanation of these features and step-by-step instructions, please follow the steps below.
Pro-Tip: Prepaid subscriptions can also be offered with standard subscriptions or on their own. To learn more, please visit Prepaid Subscriptions.
In Bold Subscriptions, navigate to Subscription groups.
Click Create subscription group.
Enter a Group name.
Note: This is an internal name only. Your customers will not see it.
Click Select products.
Select a product or variant using the following steps:
Product: Check the box to select your product(s) including all its variants.
Variant: Click on the linked variants displayed under the product name to expand them, and check the box next to the variant(s) you'd like to select.
Note: Variant level subscription groups are compatible with Online Store 2.0 themes only. To install Bold Subscriptions on a 2.0 theme, please visit our Installation Guide for Subscriptions for Shopify Checkout.
Click Confirm.
In the Subscription frequency section, use the following steps to create the frequencies you want to make available to your customers:
Under Add new frequency, enter a number, and expand the dropdown menu to select Day, Week, Month or Year.
Click Show advanced options, and select one of the following options to configure when subscription orders should recur:
On purchase day: Orders recur based on the date of the initial purchase.
On specific day of the week/month: Orders recur on a specific day every week/month, regardless of the date of purchase.
Custom occurrence: Allows you to set up custom logic for when orders recur, such as on the first Monday of every month.
Note: The last two options offer Cutoff days. For more information on how to this feature, please visit Subscription Group Settings.
Enter a Frequency name.
Note: This name is displayed in the subscription widget.
Click Save Frequency.
Optional: Select Add new frequency and repeat steps 7a-7d for additional frequency intervals.
Optional: Enable Allow minimum order requirement, and enter a number to set the minimum amount of orders that must pass before a customer can cancel their subscription.
Note: Please ensure your use of this setting complies with local laws. For more information about this feature, please visit Subscription Group Settings.
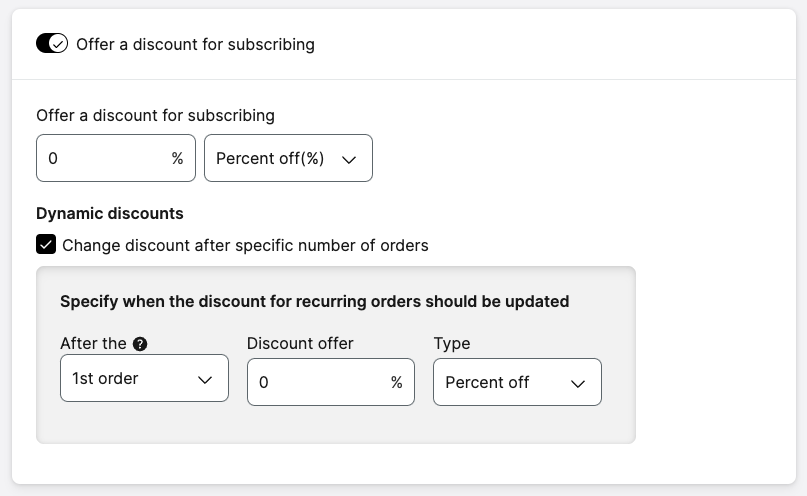
Optional: Enable Offer a discount for subscribing to provide a Subscribe and Save discount.
Note: This discount applies to every subscription order unless a dynamic discount is enabled in the next setting.
Optional: Under Dynamic discounts, check the box next to Change discount after specific number of orders.
Note: This creates a dynamic discount that automatically switches the discount amount after a specific number of orders have passed.
Expand the menu under After the, and select the number of orders which must pass before the discount changes.
Note: This number includes the initial order.
Enter your desired amount in the Discount offer field.
Expand the dropdown menu under Type and choose a Percent off or Amount off discount.
Optional: In the Customer Tagging section, enable the toggle to Apply tags to subscribers, and select your tags.
Note: Read more about this feature in Customer Tagging in Subscriptions for Shopify Checkout.
Optional: Check the box next to Apply to previously created subscriptions if you want these tags added to existing subscribers right away.
Note: If left unchecked, tags are applied to existing subscribers the next time their subscription order recurs.
Click Save Changes.
Note: Newly created subscription groups will be active on your storefront as soon as they are saved. If you are not ready to go live, you can deactivate the subscription group.
Next steps
Now that your subscription group is created, you may want to test things out or make some changes. Please refer to the following articles for some potential next steps:
To offer your product as a subscription only, please see Subscription-Only Products.
To create a test order for your new subscription product, please visit Shopify's article Testing Shopify Payments.
To change the colors or appearance of your subscription widget, please visit Customize the Subscription Widget App Block.